Delicious and Simple Home-Made Pizza Recipe (and It's Gluten-Free To Boot)
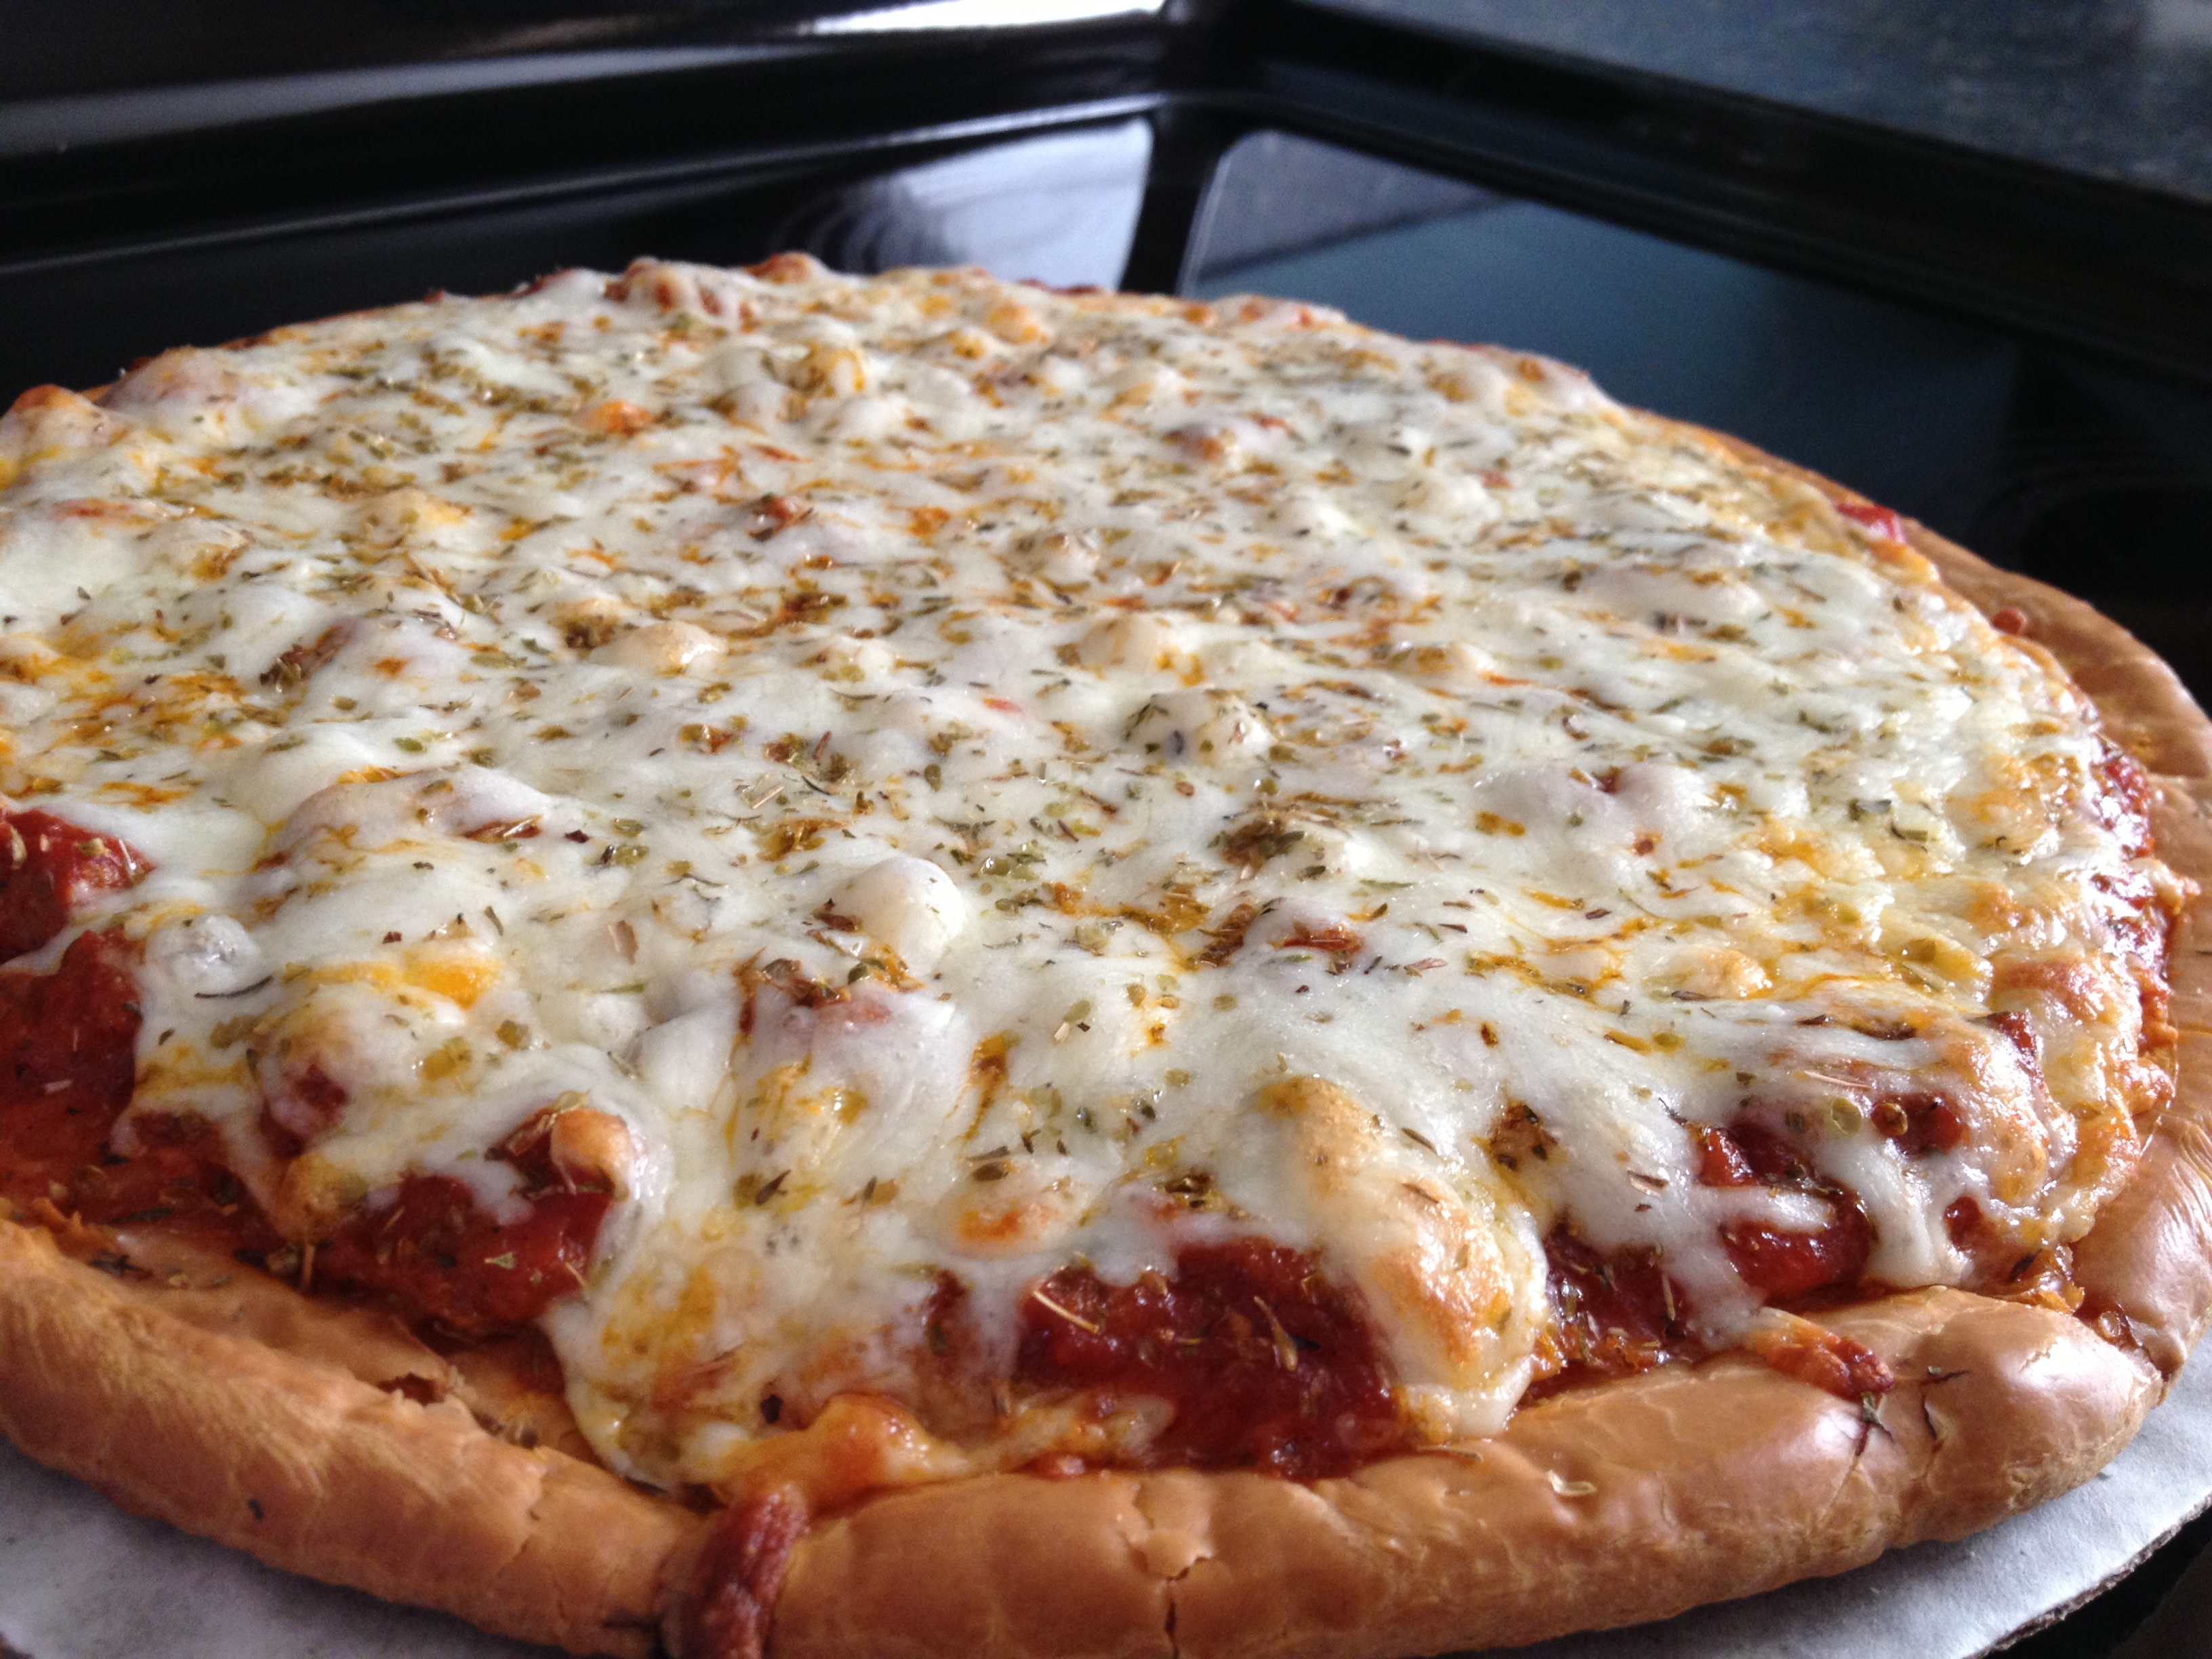
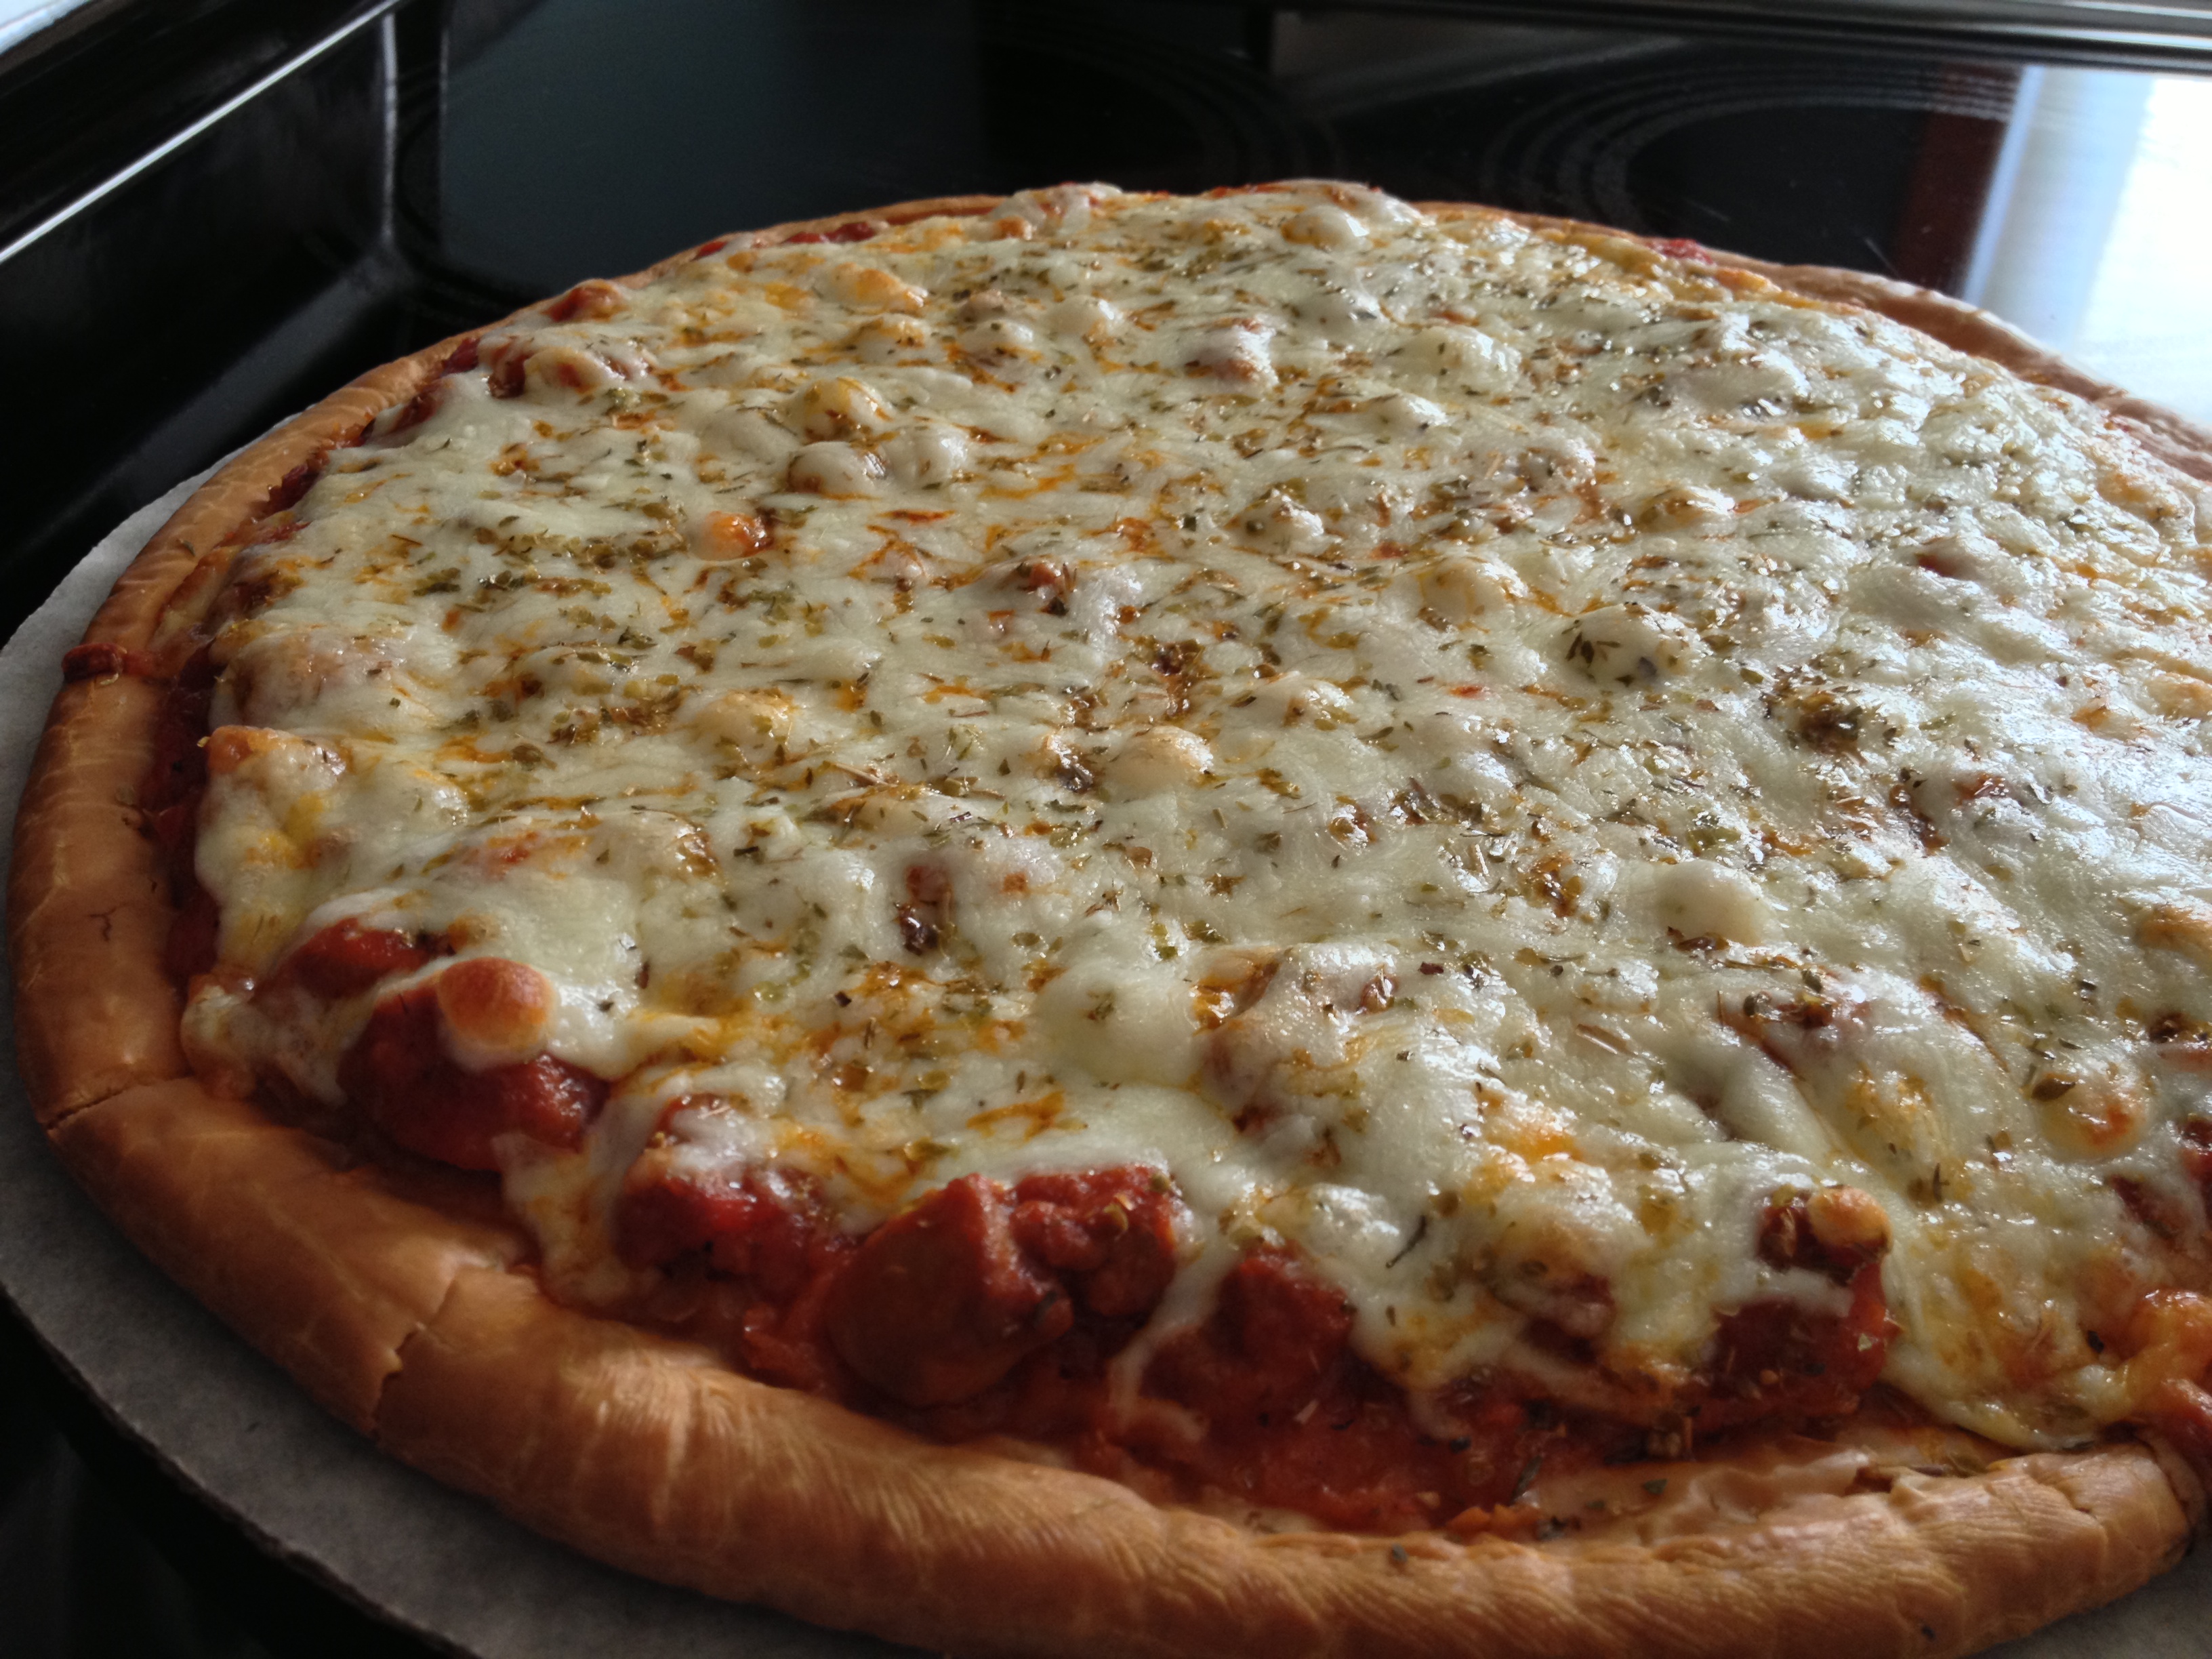
I am apparently a pizza snob. I’d say at least 75% of the pizza I’ve had in my life has been utter crap. So I’m really glad to have pizza that I can make at home, that’s not only delicious, but super easy, and gluten-free too. There are only five ingredients:
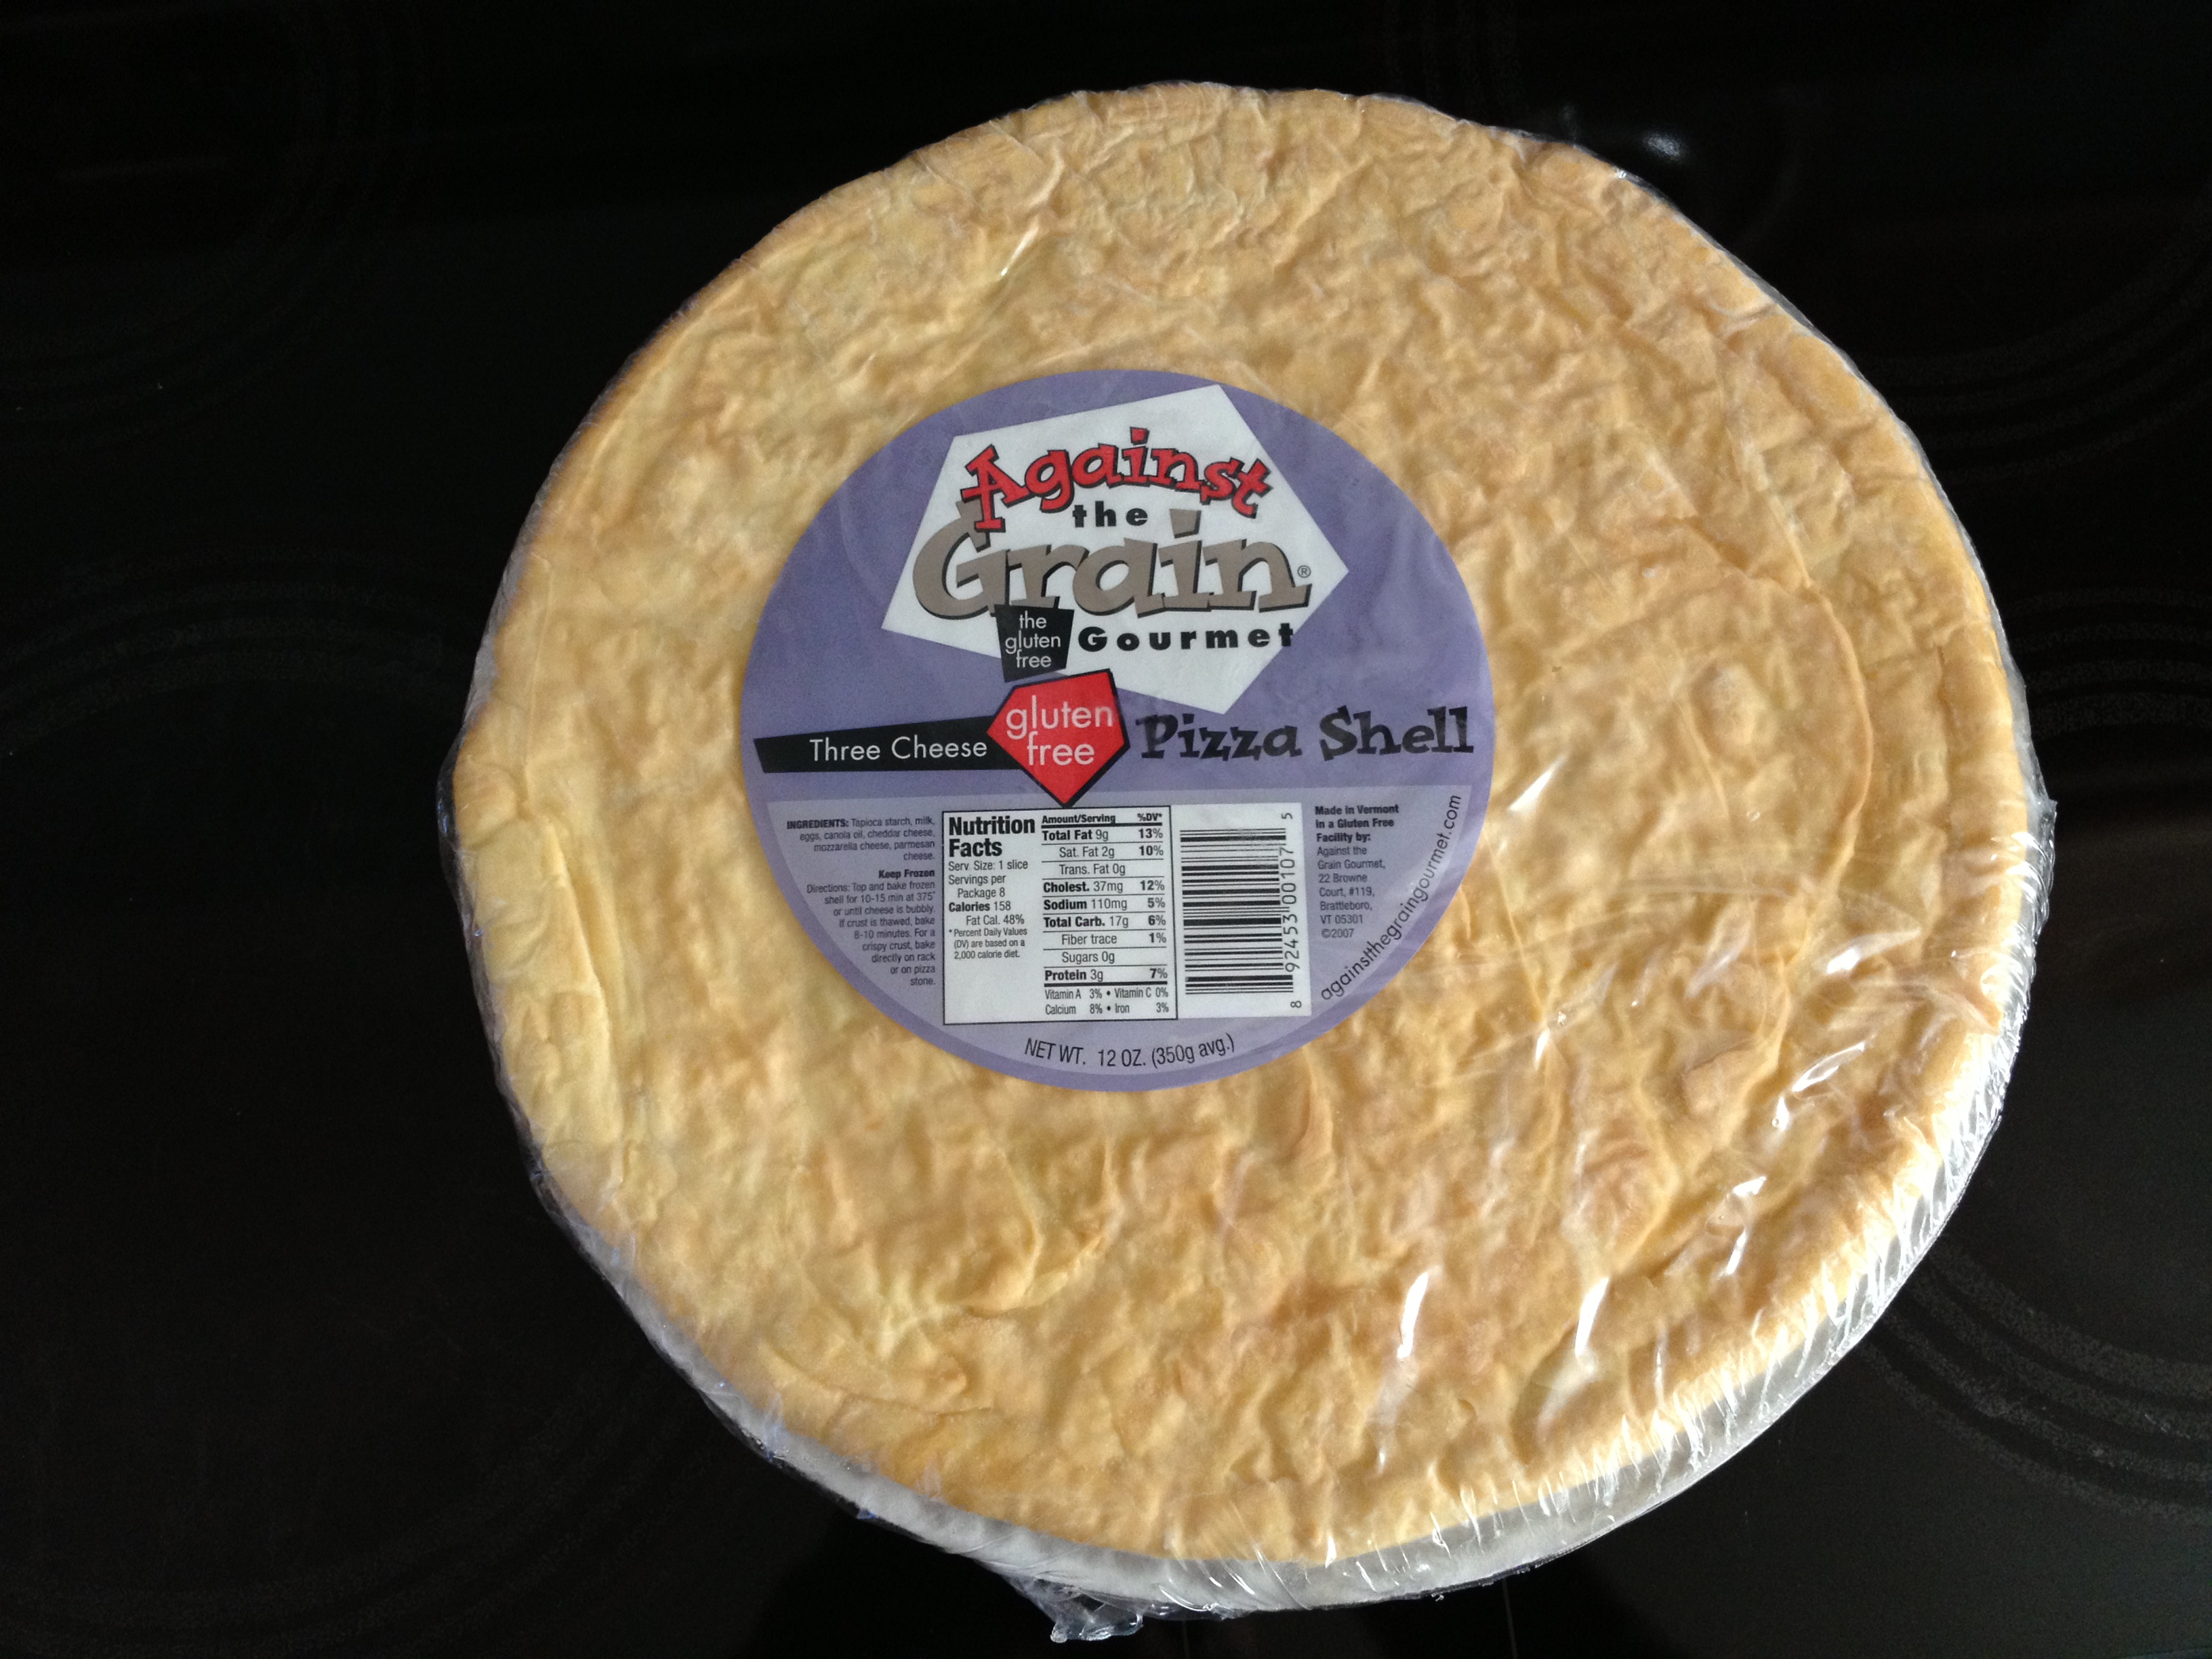
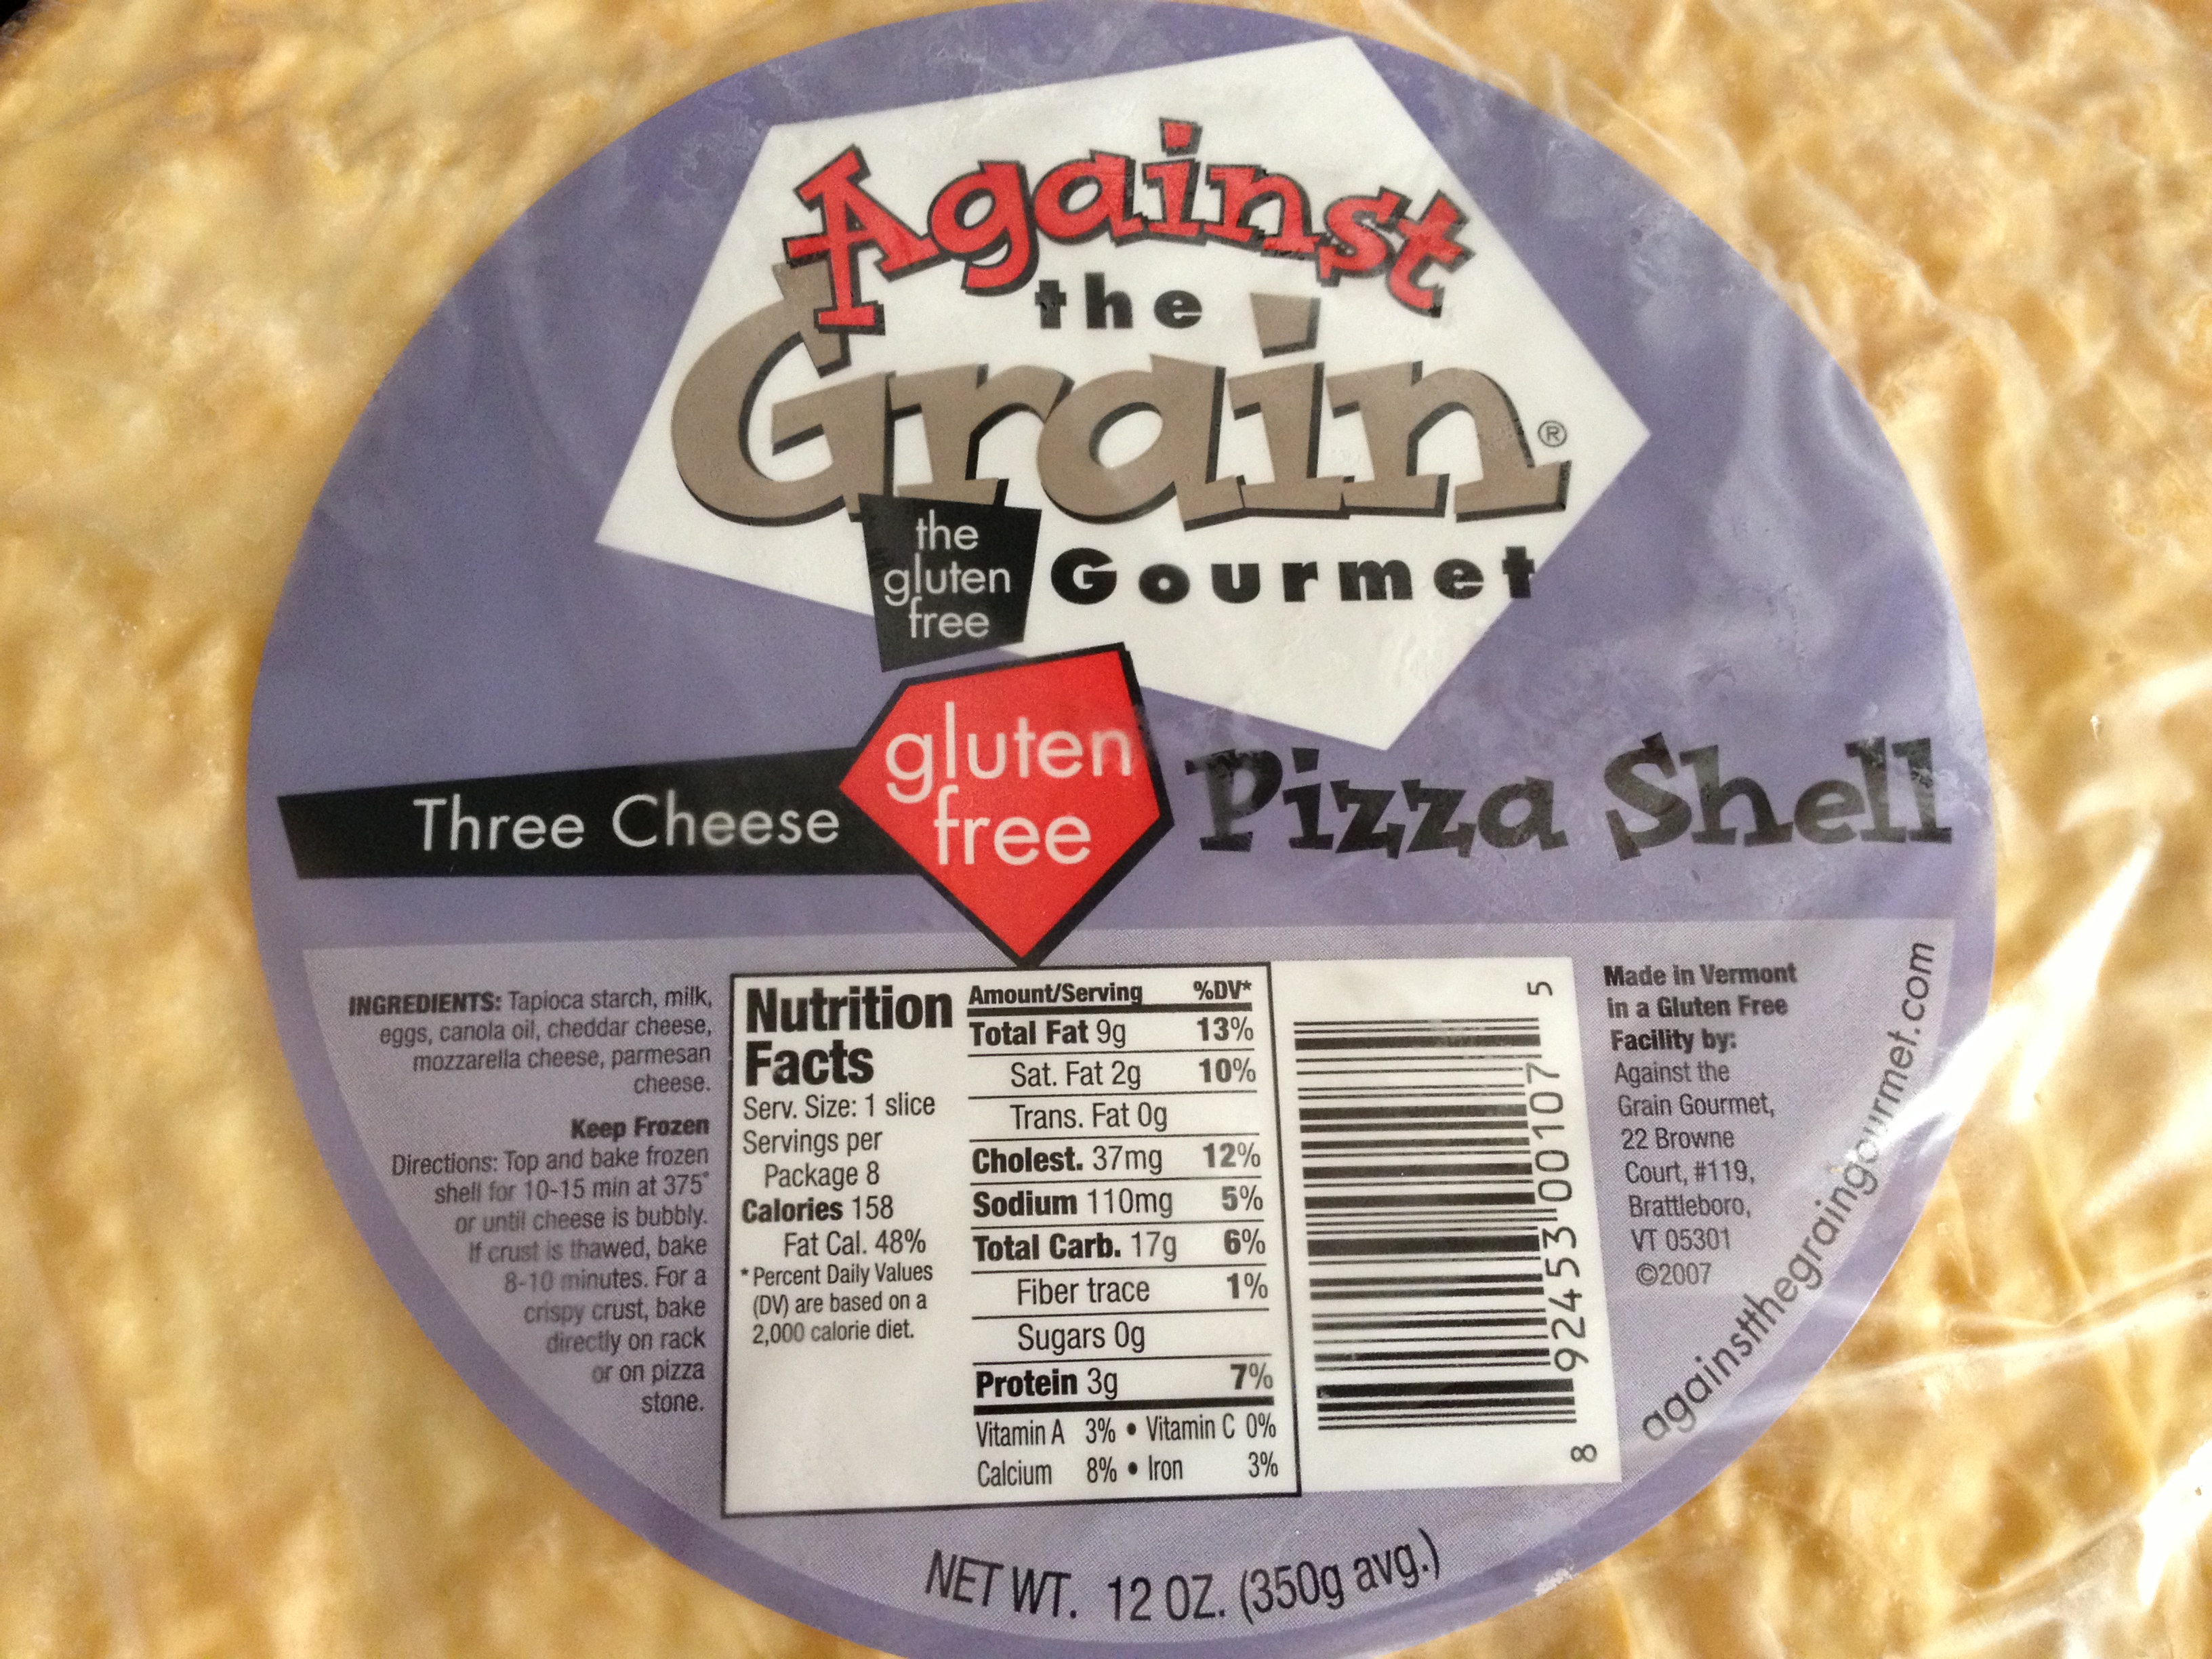
Crust: "Three Cheese Pizza Shell" from Against The Grain Gourmet, in the freezer section at the grocery store; Wegmans has it.
Sauce: Rao’s "Dinner To Go" Italian Sausage & Mushroom Sauce. Of course you can use pretty much any sauce you want, but this Rao’s sauce is amazing, it’s not all loaded up with sugar like so many sauces, and it’s got big chunks of sausage and mushroom, so if you like those, it’s a bonus three ingredients in one.
Cheese: Sargento Artisan Blends Whole Milk Mozzarella, pre-shredded in an 8oz bag, which is just the right size. Probably any shredded mozzarella would do, just don’t get any low-fat garbage.
Spices: just garlic salt and oregano.
The recipe:
1. Pre-heat the oven to 400F.
2. Put the frozen crust directly on the oven rack and cook for ~10 minutes.
3. Take out the crust, top it with ~340g of sauce (which is half the bottle).
4. Sprinkle with garlic salt and oregano.
5. Cover with 8oz of shredded mozzarella.
6. Sprinkle with even more garlic salt and oregano.
7. Cook at 400F for ~13 minutes.
The crust will be crispy/crunchy and amazing, but if you prefer your crust soft, then a) what’s wrong with you, and b) just skip the step where you cook the crust by itself first, or shorten it to just a couple of minutes.
The Against The Grain crust (or "shell") is the key here. Mozzarella is pretty much always amazing, and the sauce can be whatever kind of sauce you love, so you just need a good crust, and these guys have nailed it.
Some photos of the ingredients and the finished product:

The Best Adjustable-Height Desk: Better and WAY Cheaper Than Those Motorized Ones
Adjustable-height or "sit-stand" desks are popular now, since studies show that sitting for 8 hours a day is linked to various health problems. Not to mention the fact that anyone who actually does spend all day sitting down knows it just gets uncomfortable after a while. It’s a good idea to get up and take a 5-minute walk every hour or so, but being able to actually stand up for some of the work day, instead of only sitting, is even better.
But have you seen the prices of these adjustable desks? They range from $800 or so up to several thousand dollars. Why are they so expensive? No good reason really, but part of the reason is that their design is kind of ridiculous: there’s literally a motor that you run to raise or lower the surface of the desk.
Despite the insane prices, I see people talking about these desks all the time. I can’t believe more people don’t do the obvious thing: just buy or make a desk that’s at standing height, and then buy a tall chair (like a drafting chair) for when you want to sit down.
This is way better than an adjustable-height desk because you don’t have to adjust it. Honestly, it’s hard for me to believe that there actually are people who, during the course of the day, just randomly get up and crank up their desk-motor and raise the desk... then an hour or two later, lower it back down... then raise it up again... come on! That’s ridiculous.
The standing-height desk with drafting chair design takes advantage of the fact that your friggin’ body is already adjustable. Just stand when you want to stand, and sit when you want to sit. Genius!
It’s way cheaper, too: drafting chairs start at about $100, and you can use an $80 Ivar for your desk -- just cut the legs to your standing height and remove all but the top shelf. I’ve been using Ivar as a desk for over 10 years now and he’s held up like a champ. So, total cost: under $200.
If you don’t like the natural wood look of Ivar, or you already have a desk that you like, it’d be trivial to make ~foot-tall risers to go under the legs of your desk, using two-by-fours, or metal, or whatever you want. Then your only real cost is the drafting chair.
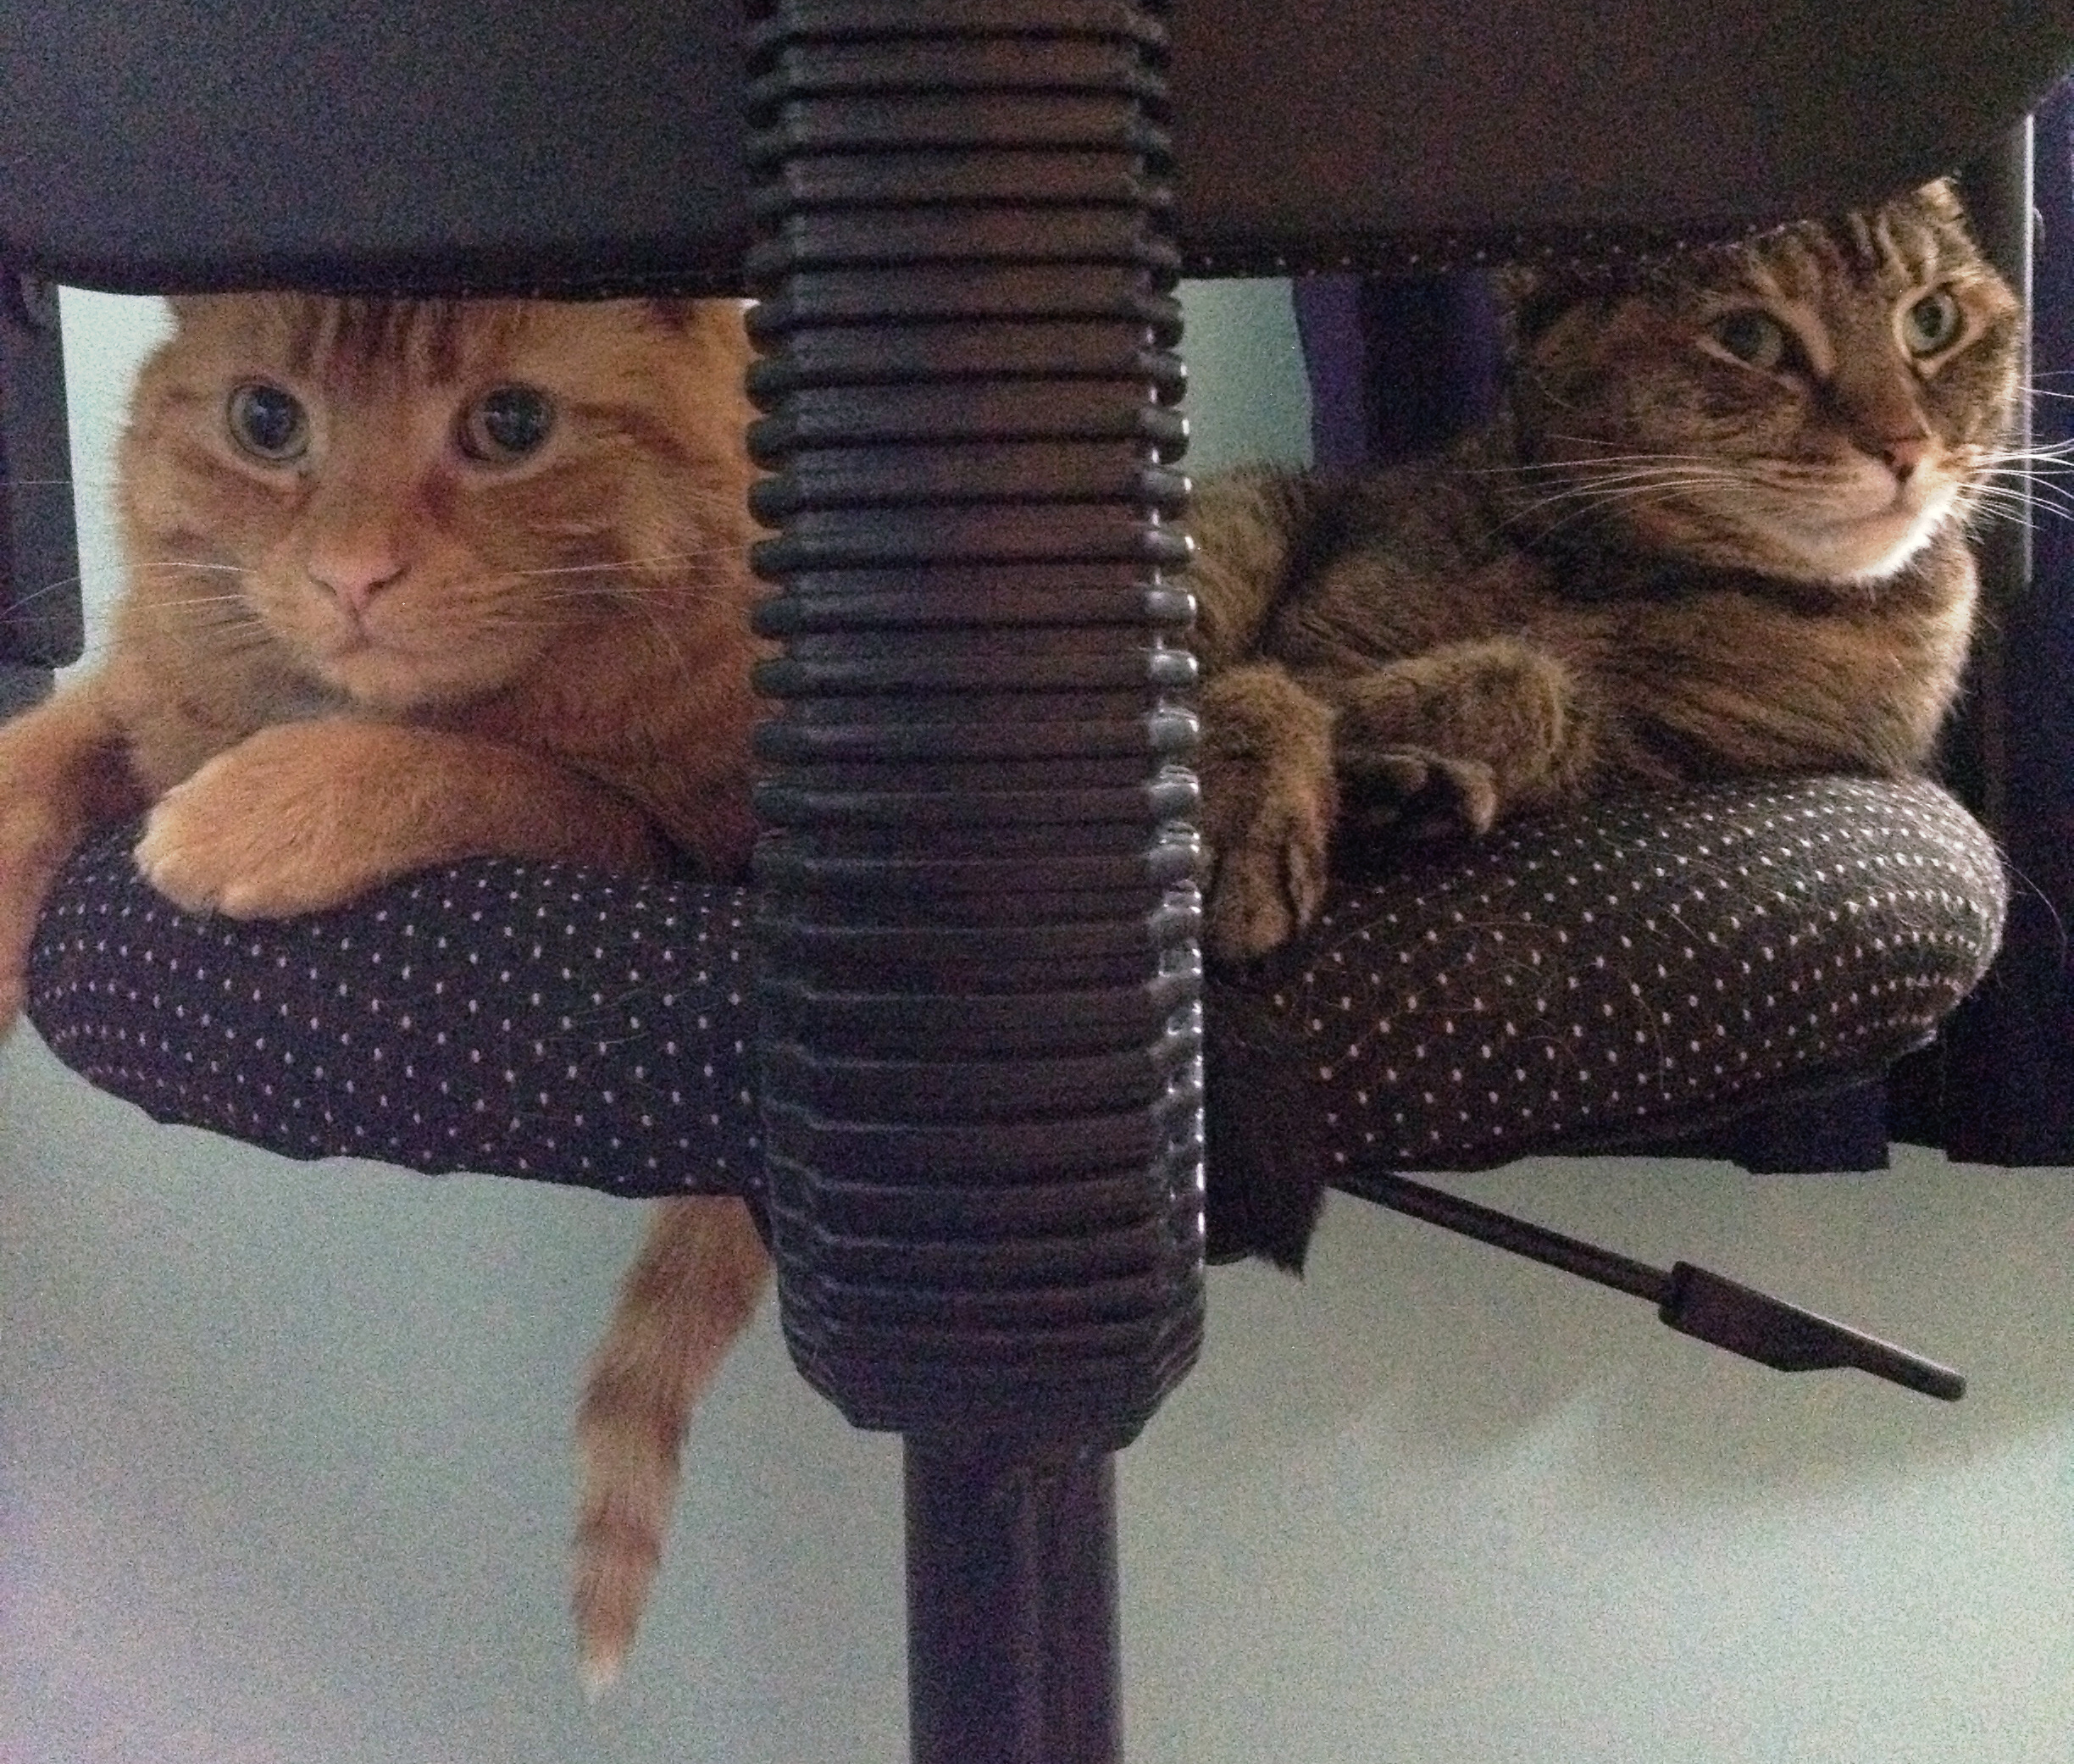
I’ve been using my homemade sit-stand desk for almost two years now, and it’s great. The only problem I’ve found is that when I stand, someone else usually swoops in and takes my chair:
Steamboat Springs Adventures
It’s summertime again, which always makes me wish that we were out in Colorado. I was browsing some of my previous photos, and realized that I never finished posting the photos from our last trip to Steamboat, in the summer of 2010.
Actually, last summer (a year after the trip) I did finish sifting through my 500+ photos and videos from the trip, and then I posted them, but I marked the set as "hidden", I think because I still wanted to write up a blog post about it?
Well, I never got around to that, but I did at least caption the photos, so the story is pretty much all there anyway. So check them out:
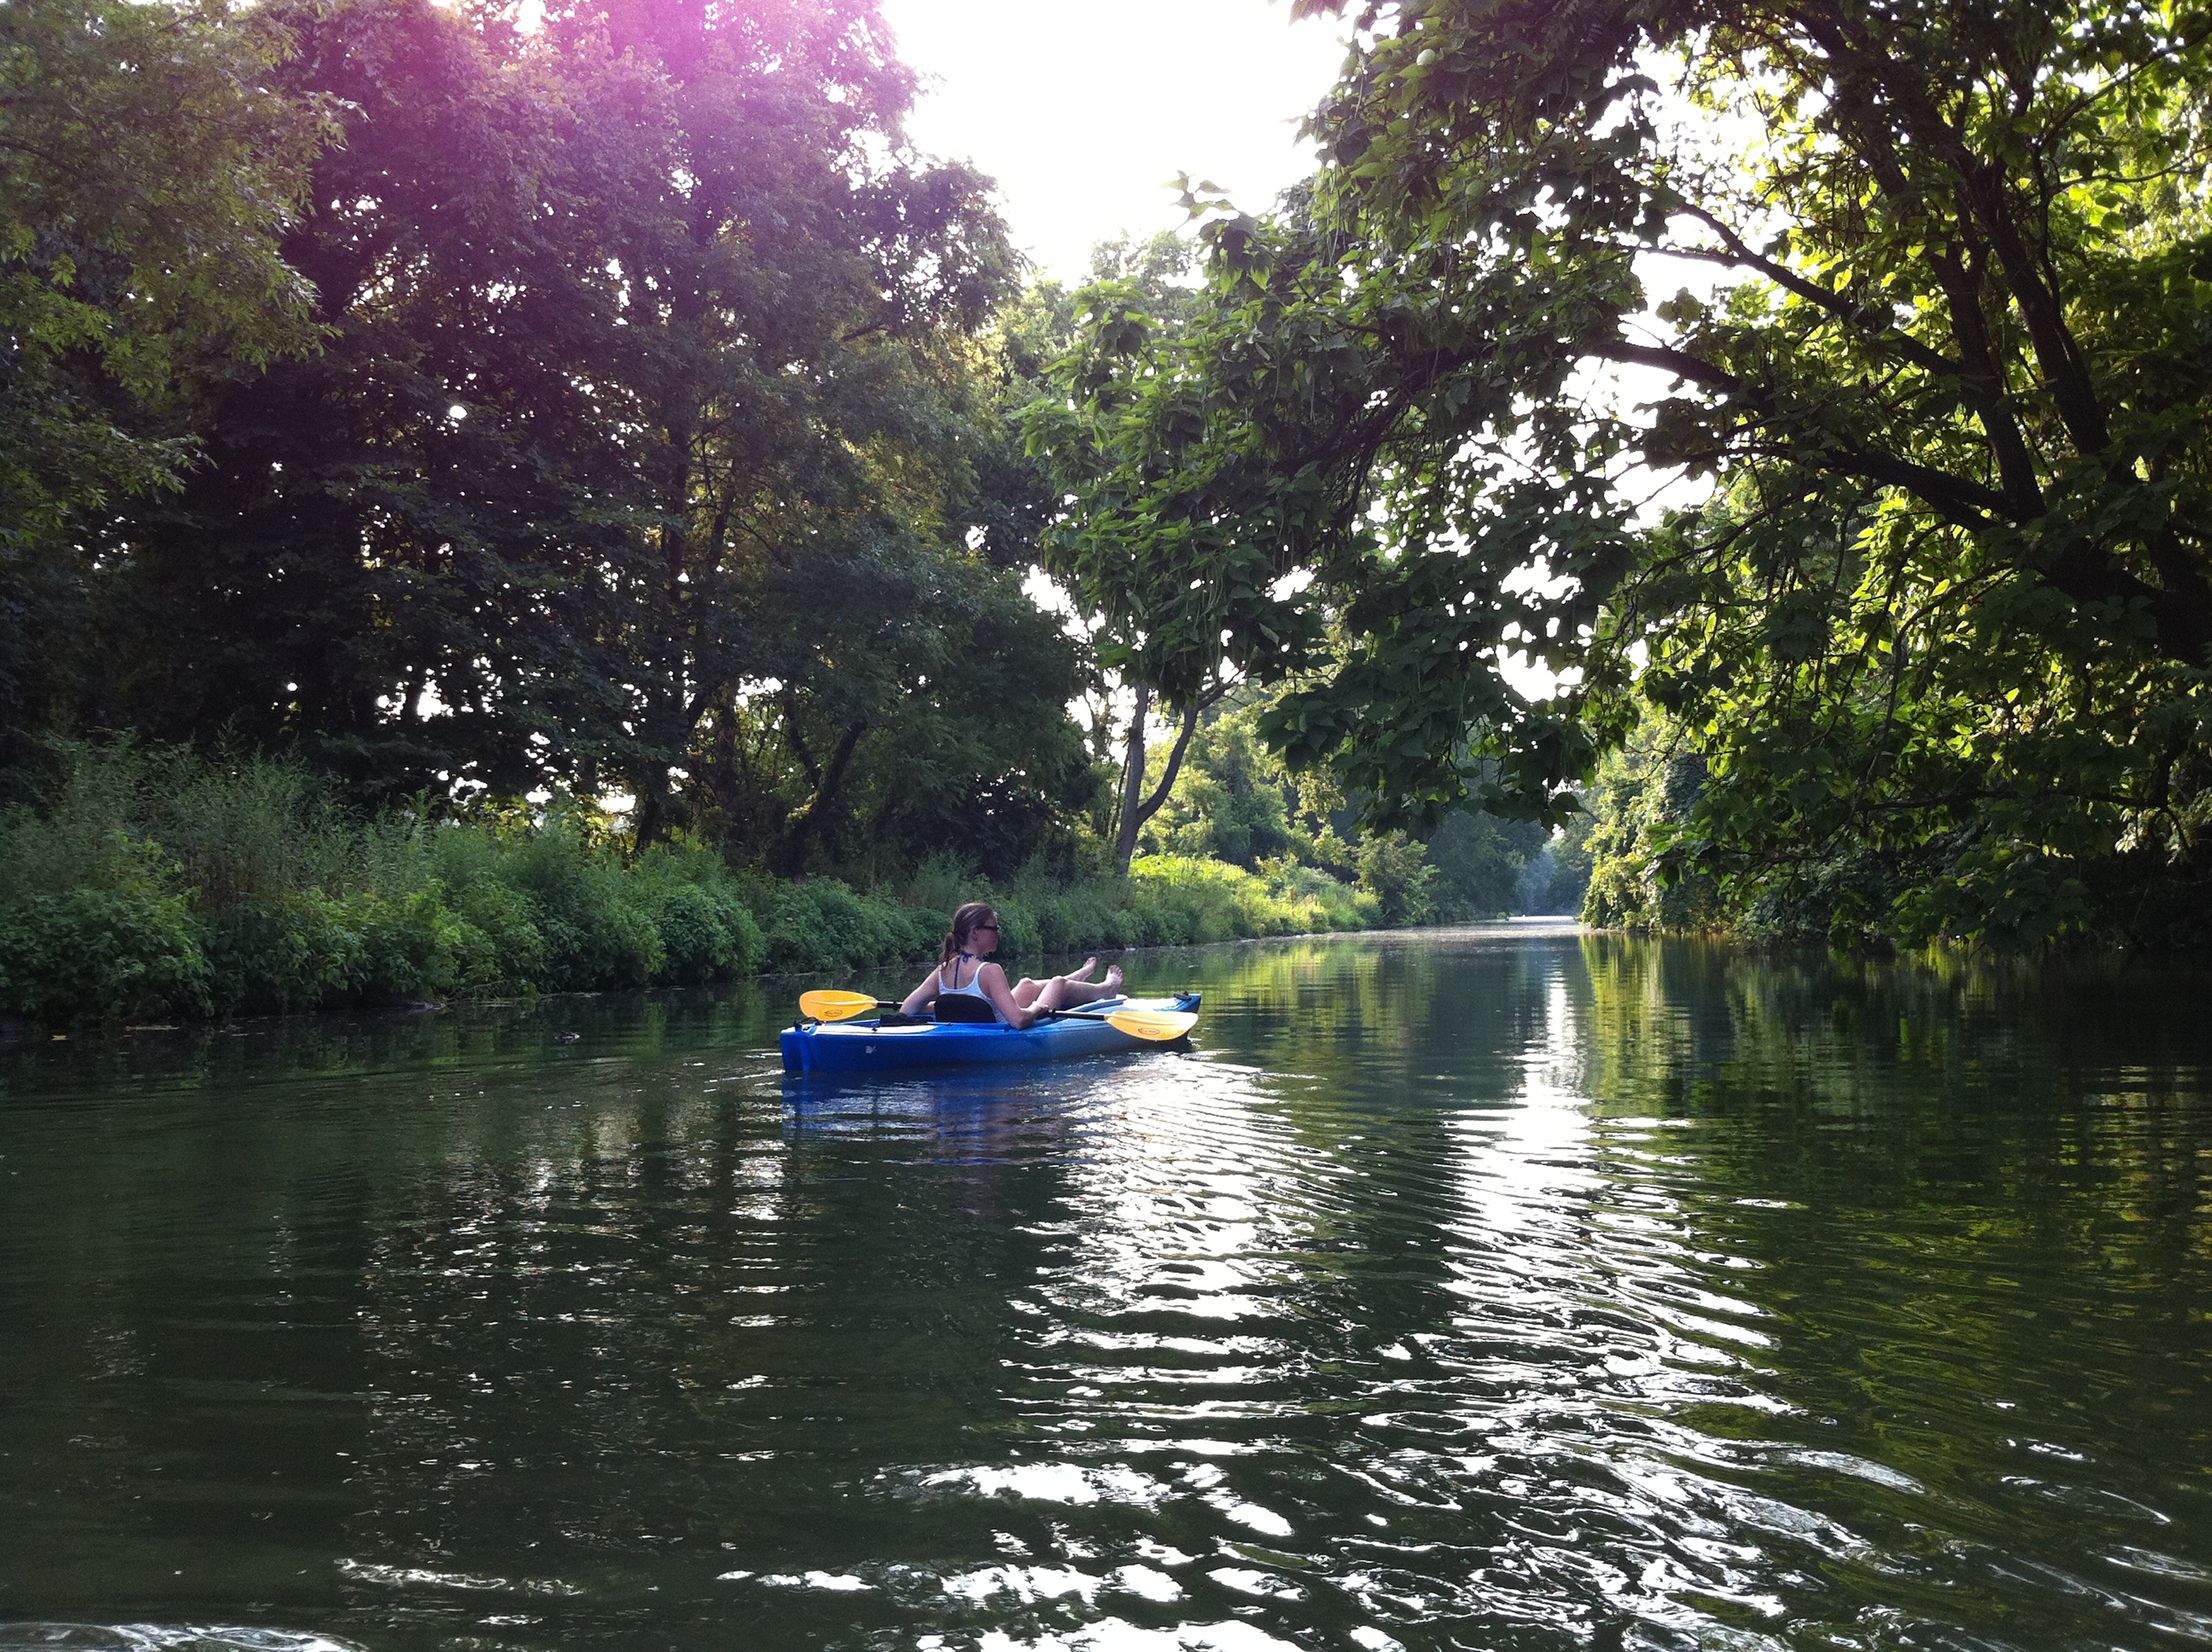
Exciting Schuylkill River Kayaking: Leesport to Elper's Landing
Based on my previous posts about kayaking on the Schuylkill River, you might think that all Schuylkill River kayaking is exciting. Well, that depends. If you’ve never really kayaked much before, or never on moving water, then the Schuylkill is indeed exciting. And even on sections that aren’t quite exciting, it’s still just really nice to get out onto the river on a warm and sunny day.
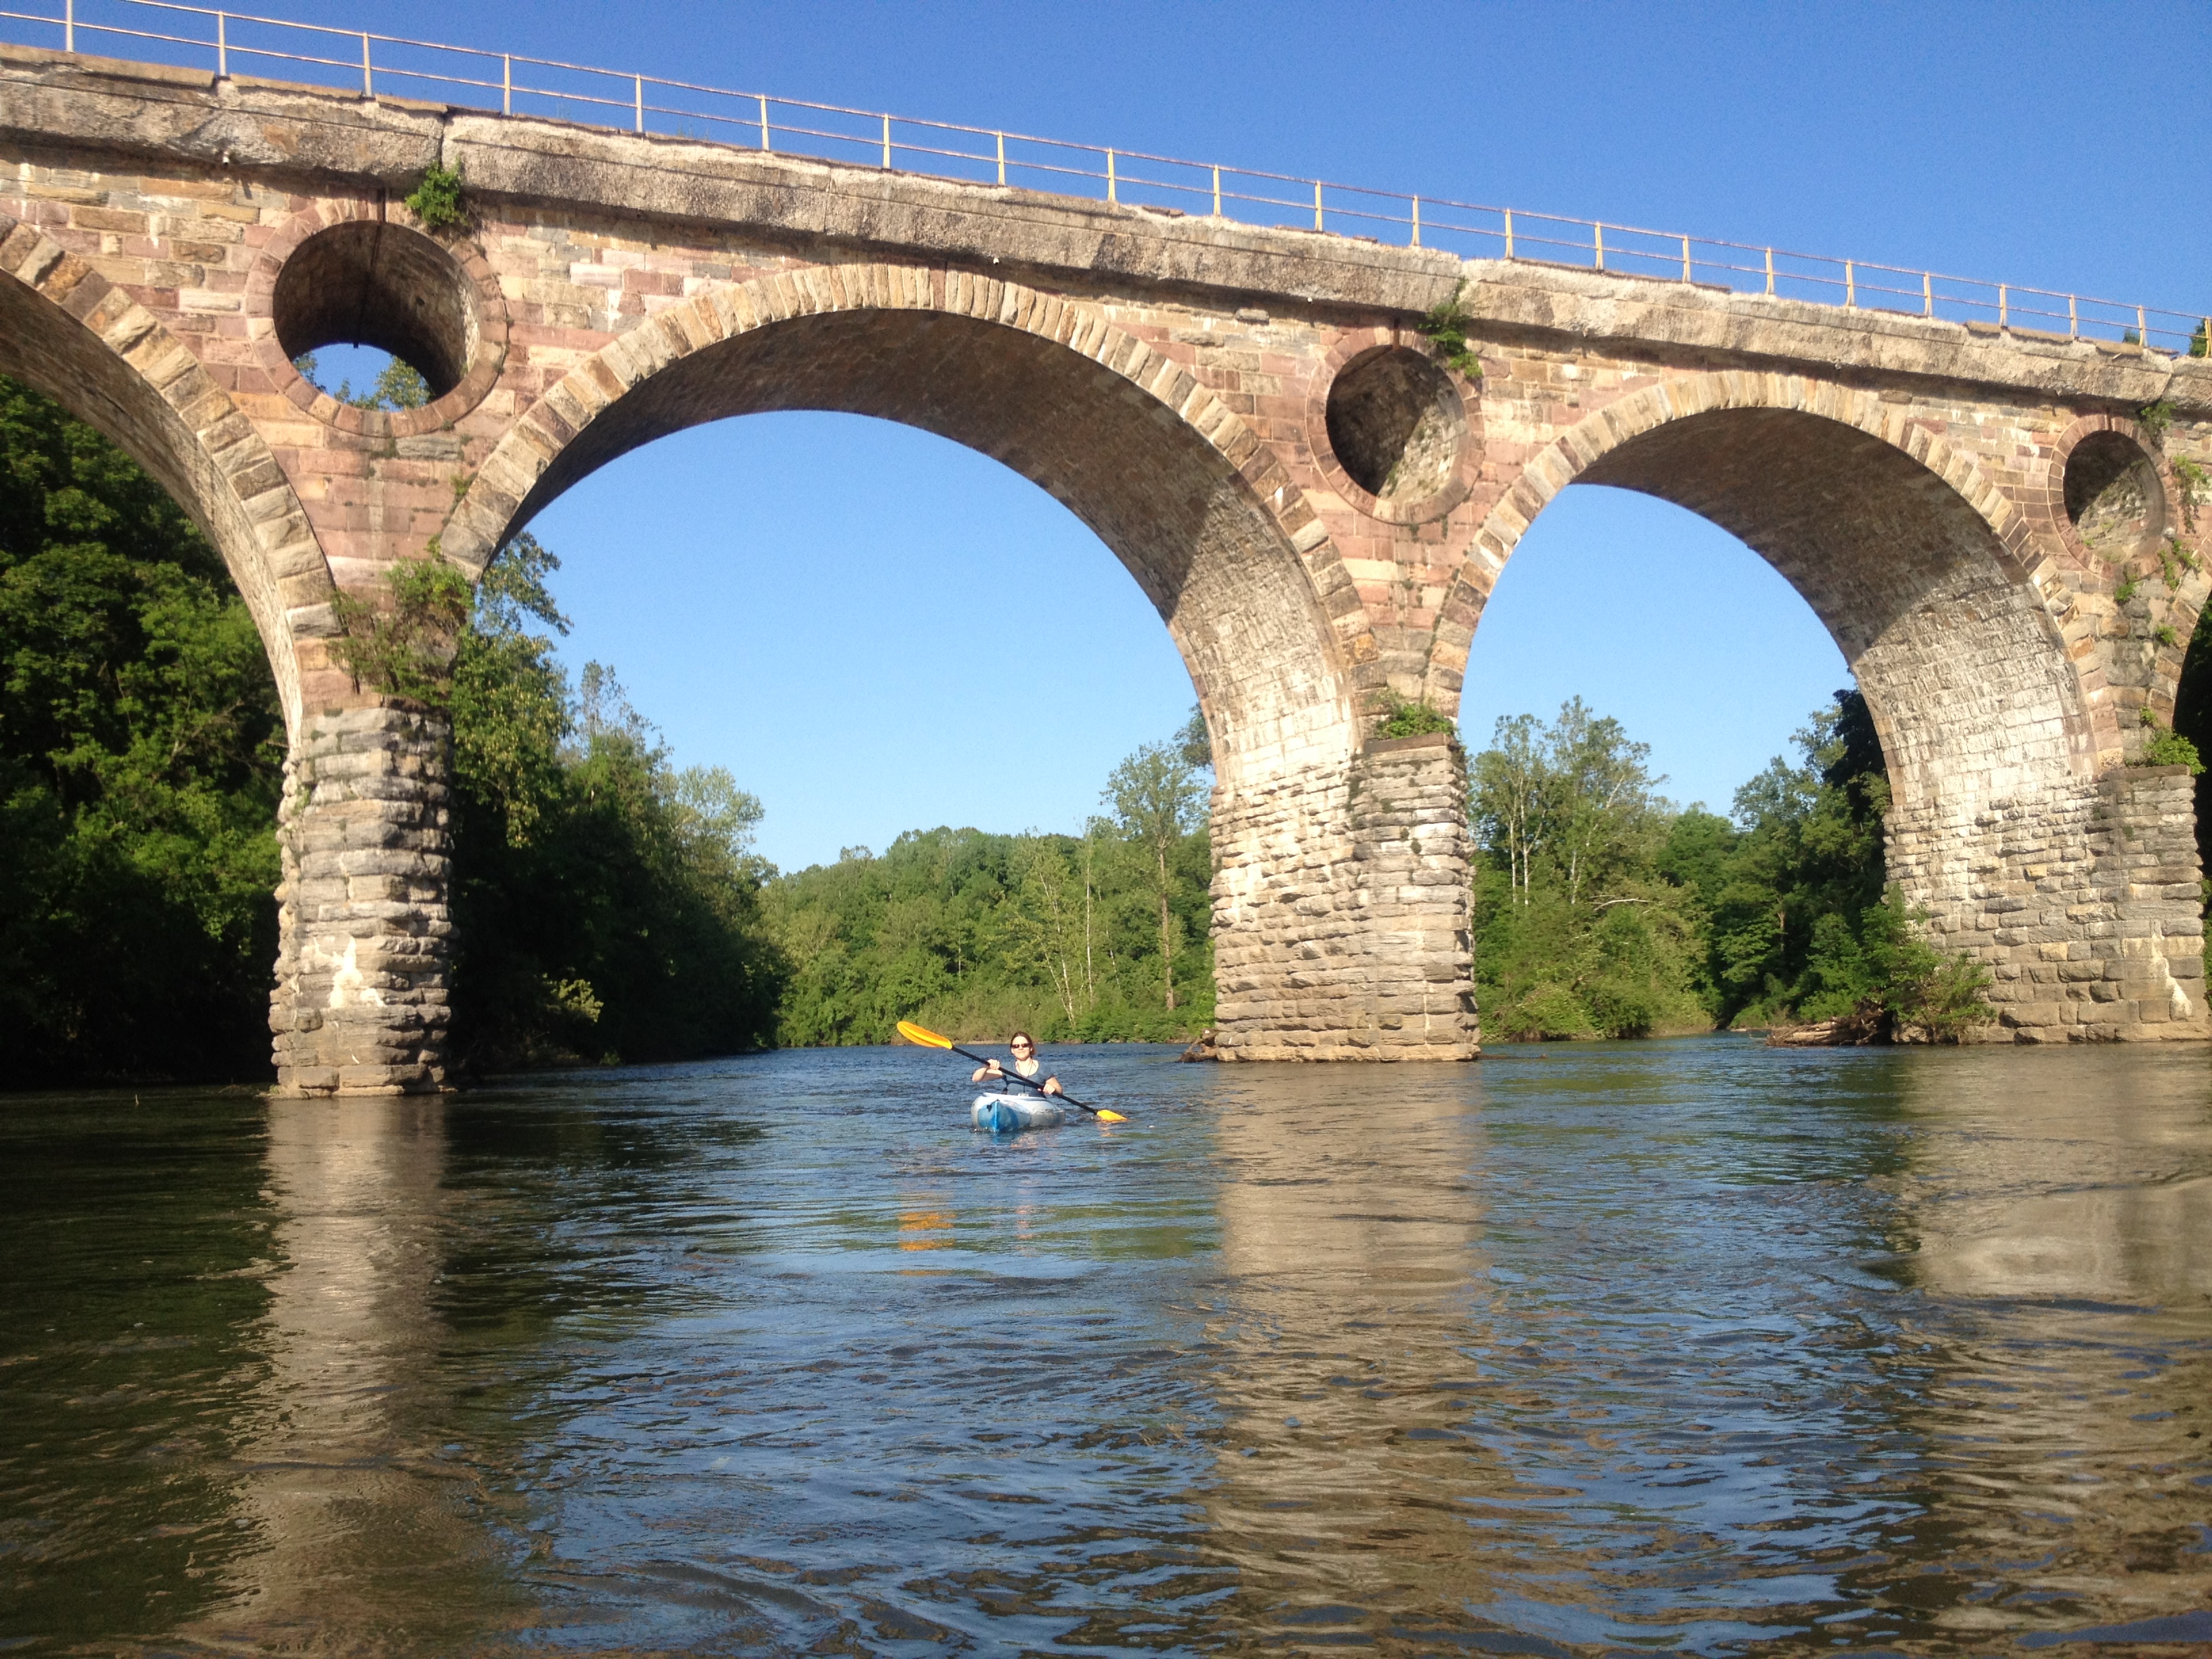
But some sections are more fun than others, as we found out last weekend when we kayaked from Leesport to Elper’s Landing. Most of the sections I’d previously kayaked were entirely flat and calm and wide-open, with the exception of the really cool (but alas really short) side-channel in Birdsboro. But this Leesport section has tons of riffles (basically mini-rapids) and even one or two genuine rapids -- almost certainly just class I, but still, enough to send a wave crashing into my chest as I crossed them, which is so fun.
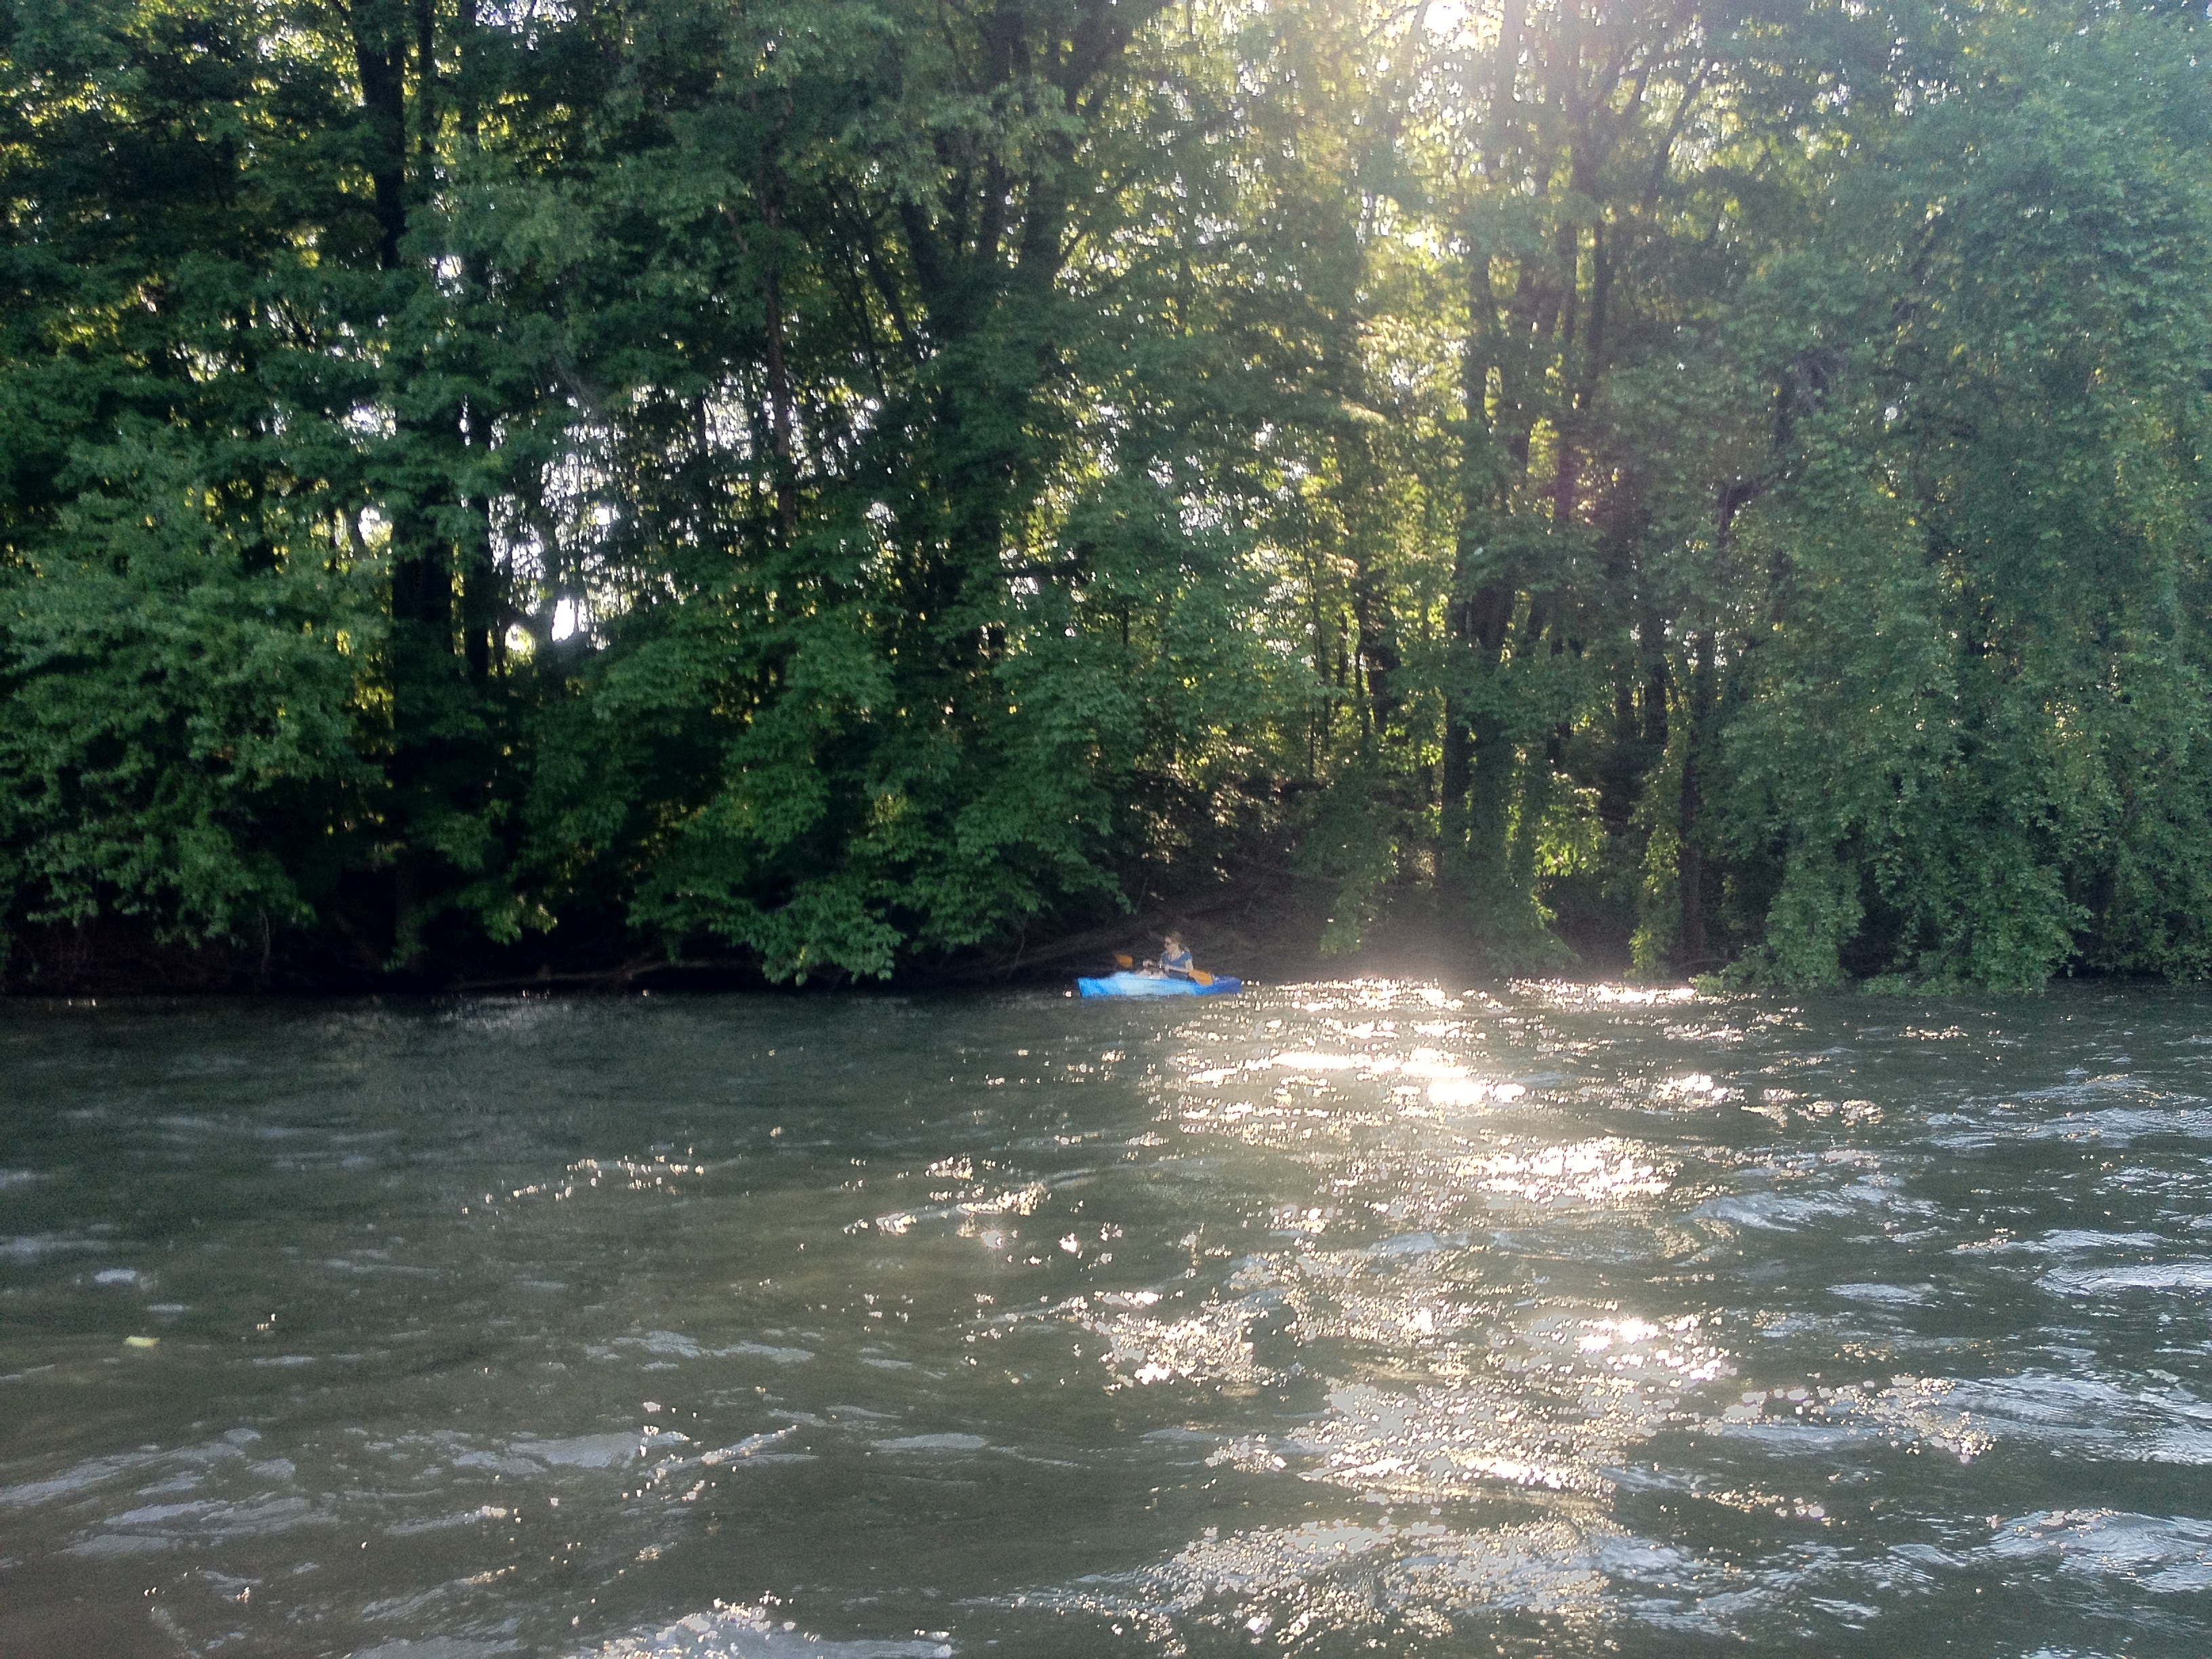
This section also has many trees along its banks whose branches hang down over the water, so you can paddle over and float under the trees and feel like you’re in the jungle. In some spots there are also houses with neat decks right along the water, which I always enjoy checking out as we float by; other spots had big rock walls along the sides. And this stretch of river is also pretty windy, which makes it more interesting than the long straight stretches.
The put-in location is behind the post office in Leesport. We parked in the grass behind the post office, where some other cars were already parked. The take-out is called Elper’s Landing, which is a bit beyond Reading Boat Works; it’s not hard to find, but there aren’t any signs for it, and there are several Keep Out signs along the way for private driveways branching off the road, so just keep on the non-signed road until you get to the landing.
Here’s the GPS map of our route:
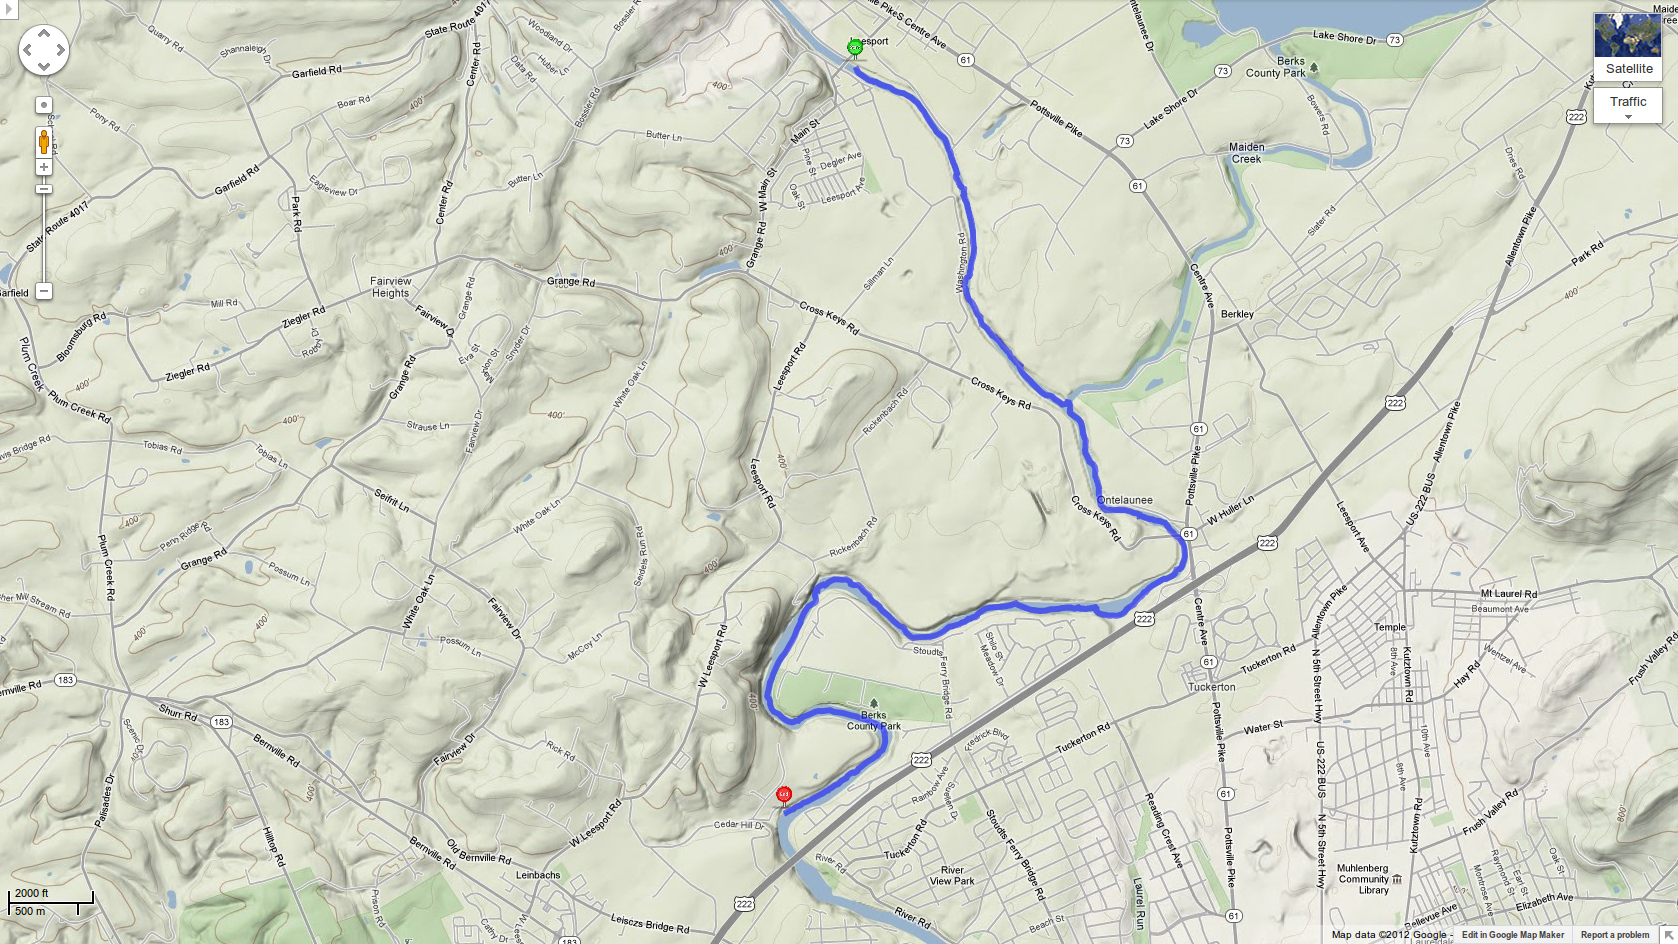
Trip stats: date: 20120519-1704; duration: 110 min; distance: 6.86 mi; river discharge: 1280 cfs; water temperature: 67F; weather: sunny and 80F; map: Schuylkill River Water Trail.
Previous kayak trip: Kayaking the Lehigh River from Jim Thorpe to Lehighton.Next kayak trip: coming soon!
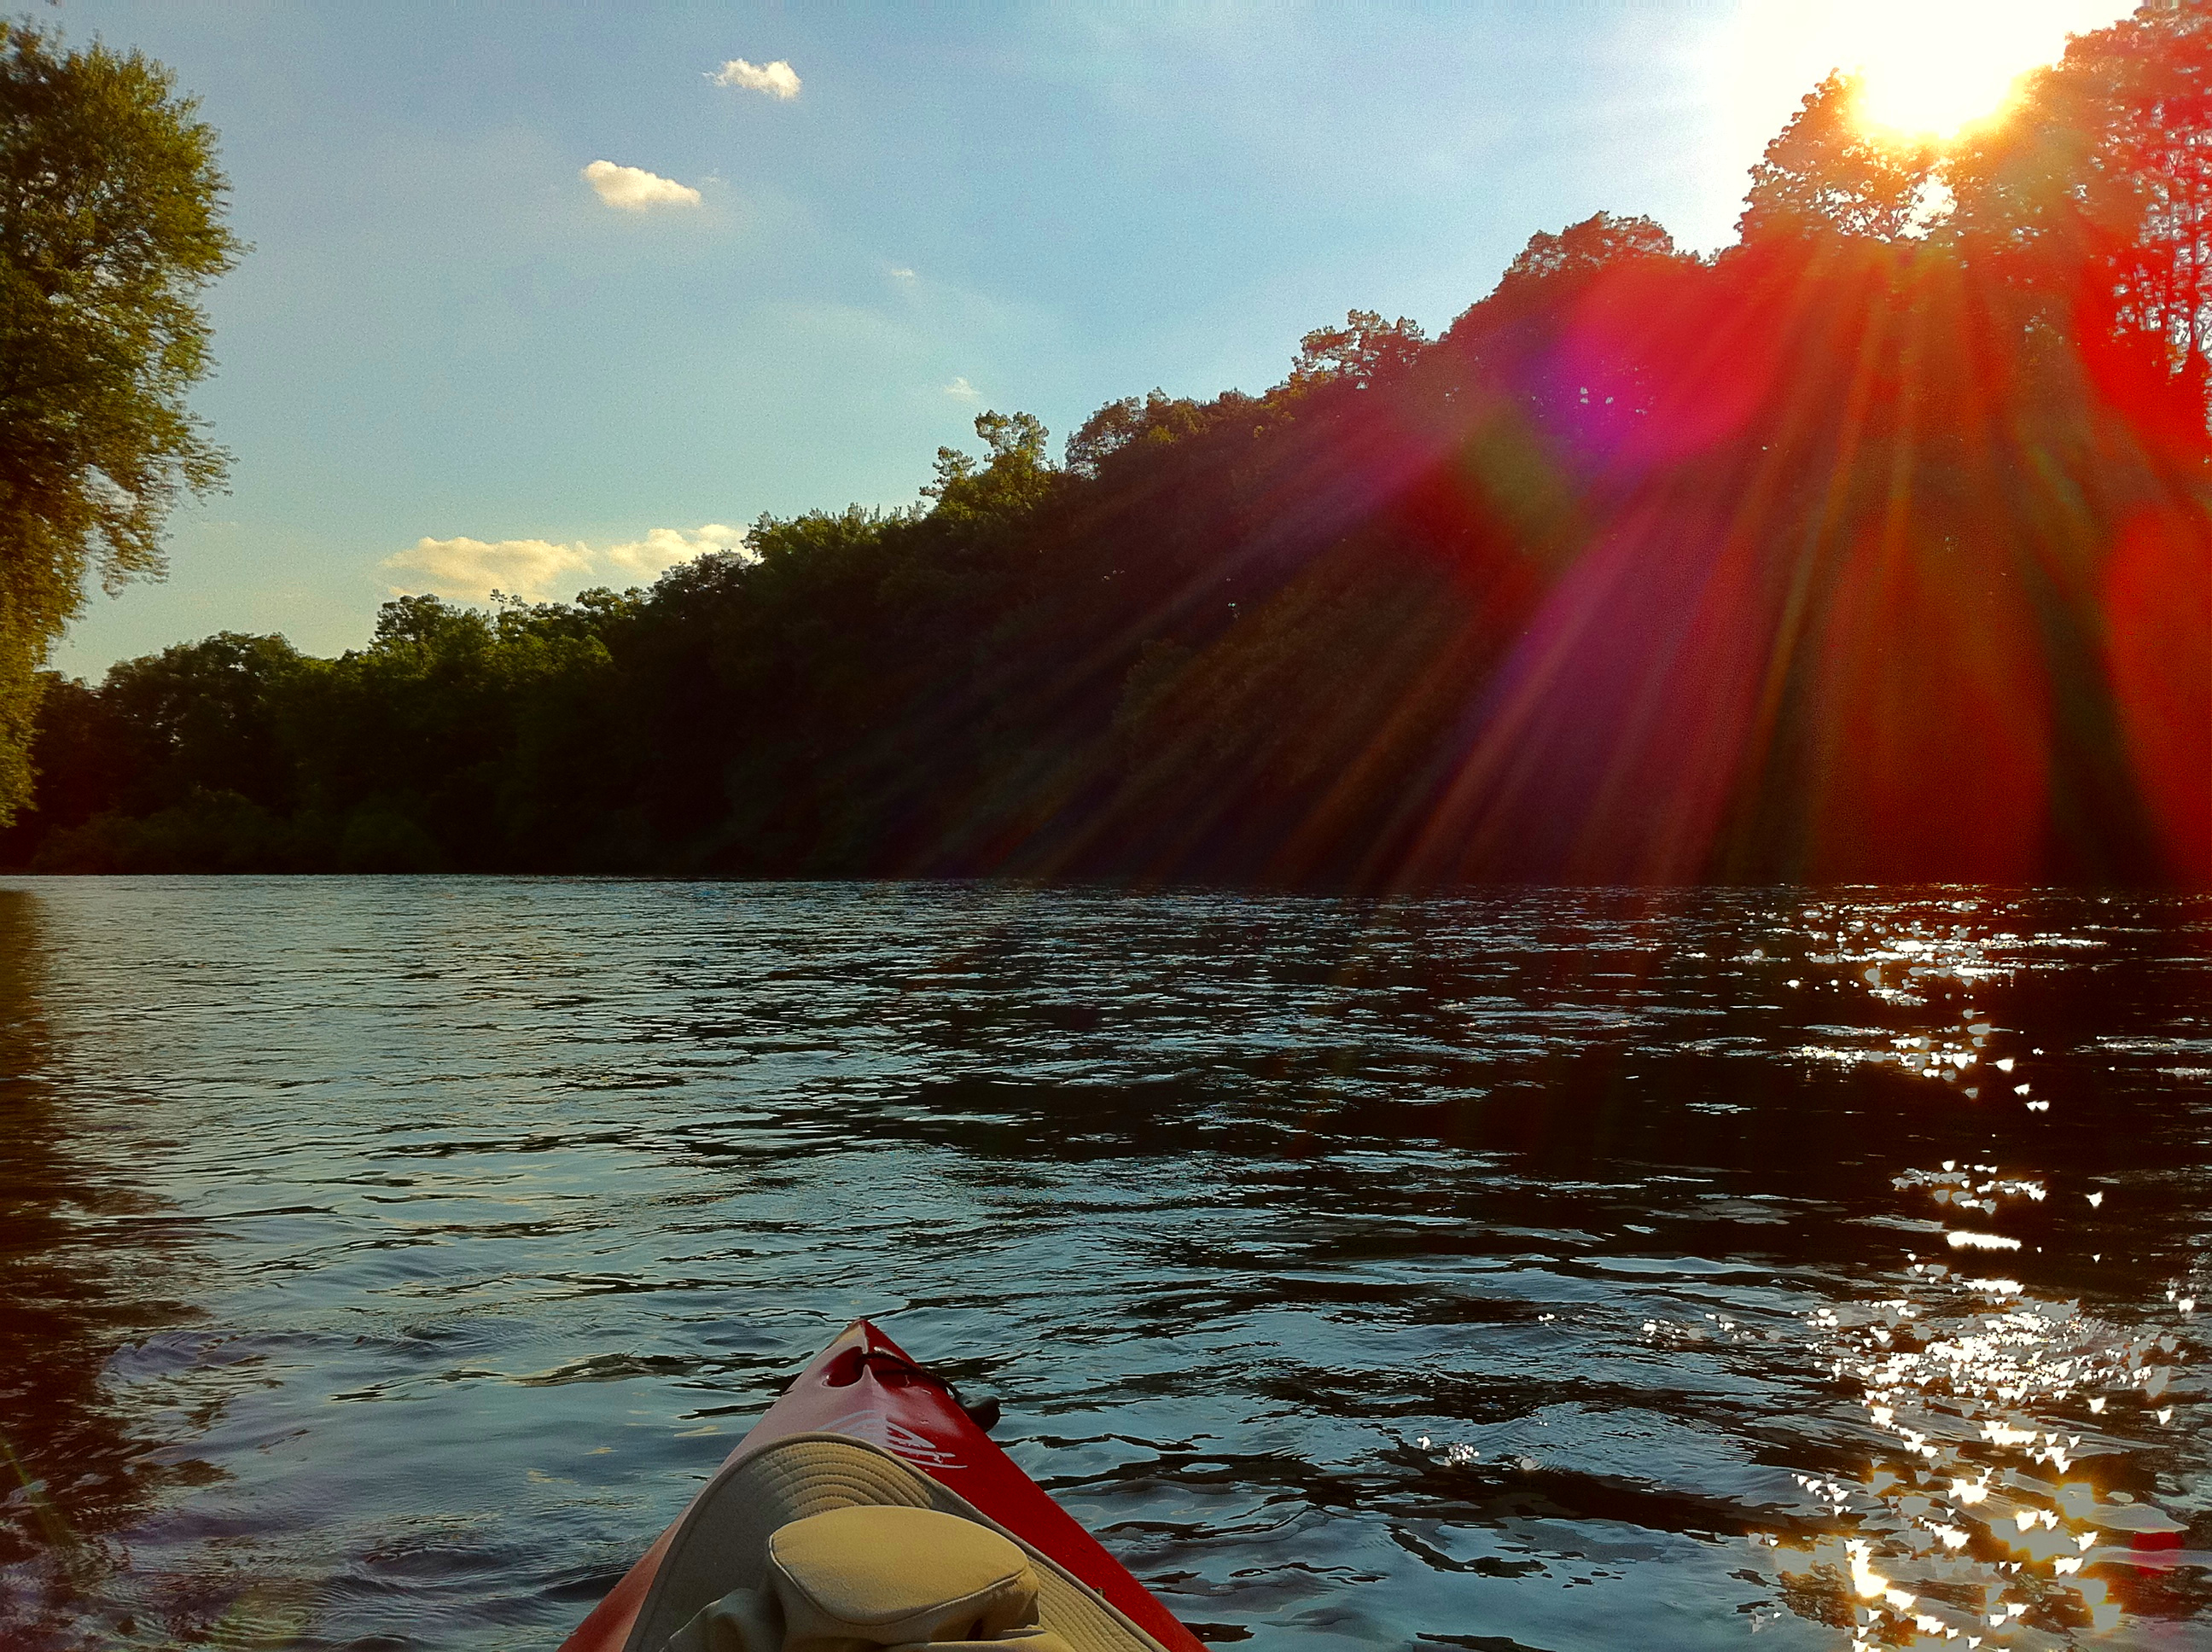
Kayaking the Lehigh River from Jim Thorpe to Lehighton
After our first Lehigh River kayak trip went so swimmingly, we were psyched to go back again. The class I rapids had been no problem at all -- very fun actually -- in our recreational kayaks, and I planned our next trip to be an extension of the same route that would also include some short class II rapids. So whereas last time we did about half of the route from Jim Thorpe to Lehighton, this time we did the whole thing.

There are two class II rapids on this route, the two shown in yellow at the top of the Weissport Canal Loop map. According to American Whitewater, the first one is Bear Trap rapids; I can’t find a name for the second one, under the railroad bridge.
We navigated these rapids easily (as you can see in the videos) in our recreational kayaks, an Emotion Glide and a Perception Sport Sound 9.5. The water level was very high during our run -- about 4000 cfs, compared to ~500-1500 cfs normally -- because of a larger-than-normal dam release to make room in the reservoir for the expected rain from Hurricane Irene, hitting in the next couple of days. This high water level might have made the rapids easier, because we didn’t hit, nor even see, any rocks at all in the rapids; but we also went back a week later and did this same run again at a normal river level, and again had no problems.
I don’t think these kayaks would do well up in the Lehigh Gorge with the class III rapids, because they can’t be quickly turned, nor unrolled, the way whitewater kayaks can. But being able to do class IIs opens up a pretty large amount of the Lehigh River below the gorge, so we have lots more yakking to look forward to!
Check out all the photos and videos from this run.
Previous kayak trip: Kayaking the Lehigh River: Weissport Canal Loop.
Bonus kayak trip: Kayaking the Hiwassee River in Tennessee.
Next kayak trip: Exciting Schuylkill River Kayaking: Leesport to Elper’s Landing.
The Best Gluten-Free Croutons
Actually, these are the World’s Best Croutons, gluten-free or otherwise. They’re even better than the amazing Texas Toast croutons, which I love. Unfortunately, Against The Grain Gourmet doesn’t currently sell croutons, so you need to buy their rolls or baguettes and make them yourself, but it’s an easy recipe:

Start with a thawed ~15-inch/~215g Against The Grain gluten-free baguette (or a similar weight of their rolls) and cut it into crouton-sized pieces.
Melt one stick of salted butter (~115g) in a pot on the stovetop, then put the bread pieces into it and stir them around so they soak up all the butter.
Pour the pieces onto a nonstick baking pan (without tin foil), spread them out into a single layer so there is minimal touching between the pieces, and sprinkle liberally with garlic powder.
Bake at 350F for 30 minutes, or a little less if you like them less dark/crispy; but not too much less, otherwise the insides of the larger pieces might still be soft when they’re done.
After cooking, let them cool a bit, then put them into a zip-lock. They keep in the cabinet for a couple of weeks at least.
These croutons are seriously amazing. Going gluten-free almost required me to give up one of my favorite meals, because to me, a salad without croutons is barely worth having -- but this Against The Grain bread saved the day.
Forecast Mix-Up
Hey, that’s not the forecast I ordered:

I was thinking more along these lines:

Ricky Gervais: I Have No Balls
Here’s Ricky Gervais on the cover of some magazine, attempting to look jaded or tough or something, while mocking Christianity:

Scrawled across his chest are the words "I have no balls." Well, he thinks it says "Atheist." But considering that mocking Jesus is about the safest, most politically correct, and least original thing that anyone could do, it’s clear what the real message is. Yawn. Call us back when you grow a pair and start mocking Muhammad.
Kayaking the Lehigh River: Weissport Canal Loop
Well, it may have ruined me for the Schuylkill, but the Lehigh River is an amazing place to kayak. Kim and I paddled the short Weissport canal loop on Saturday, and it was one of the most fun things we’ve ever done.

For this loop, you start at the Canal Street parking lot, where you get into the canal and head north. This canal is much cleaner and less stagnant than the one on the Lock 60 loop on the Schuylkill River. It’s got nice stretches full of huge lily pads, and much of the bottom is covered with these long, soft, pine-needley plants whose arms reach up and wave as you pass by. It’s also cool: on this 90-degree day, the river was about 73F, and the canal wasn’t much warmer than that.
The one downside to the canal is the portages: in the less than 2 miles that we were on it, there were 3 spots where we had to get out and drag the kayaks over land. The first one is barely 5 minutes into the trip, and the portage distance is maybe 10 feet. The second one is about 15 minutes later, and it’s a few dozen yards. The third portage is referred to on the map as the "last canal portage", and indeed, it appeared that the canal ended at this point: it got really shallow and then turned into a very small stream. There is a walking trail (the D & L Trail) all along the route between the canal and the river, and we had to get out and drag the kayaks on this trail about 500 feet upstream until we found a spot where we could access the river.
My one major gripe about this loop is that, based on the official-seeming map on the Wildlands Conservancy website, I expected the transition location from canal to river to be at least easy to spot, perhaps even marked in some way. But that wasn’t the case at all. For one thing, the canal kind of just ends, and although the trail is still there along the left bank, there’s no easy spot to take out at. In fact the one spot that looked like it might be a good take-out location was covered in hay with new grass growing up through it, as if they decidedly did not want you to use it as a take-out. But most of the rest of this northern stretch is full of trees and overgrowth that would be tough to get through. And then, when you finally do manage to get up onto the trail, you find a fence along the lefthand side, between the trail and the river -- again, as if they really don’t want people to do this loop. The reason we walked 500 feet upstream to get into the river is that, in addition to the map and my GPS seeming to indicate that that was the spot, we also had to walk about that far just to get beyond the fence.
Rapids!
But griping aside, when we finally did get into the river, holy cow was it fun! There were class-I rapids right at the put-in, and there were ye-haws all around. This was our first time on whitewater (other than a bit of rapids on the Yampa River in Colorado, but that was in a raft) and it was really exciting. I chose this loop because it only has class-I rapids, and only 4 of them, but they were still really awesome. Besides the whitewater, the other thing that makes the Lehigh more exciting than the Schuylkill is that the water is moving much faster, especially during dam releases from the F.E. Walter Dam, which on this day raised the water level from about 550 to 990 cfs at the Lehighton gage. And the Lehigh water is also nice and cool, being 13 degrees cooler than the Schuylkill on this particular day.
Actually, I do have one other complaint about this trip: I wish the river section were longer! It was over in a flash. We spent about an hour padding up the canal, and about 40 minutes coming back down the river, which included a 10-minute stop along the bank to swim. At the end, we took out at a big rock hill along a curve in the river, which was a bit of a challenge given the speed of the water, and then the need to carry the kayak up the ~20-foot hill of boulders, but nothing too problematic.
After getting home and reviewing the map and GPS log, I decided that I think we got into the river a bit earlier than the map intended. I now think that if we’d walked another hundred yards upriver, we would have found the intended put-in spot, which perhaps would have been marked with a sign or something. The spot where we did put in was kind of a side-channel beside some small islands, and it was pretty shallow and rocky; if it hadn’t been a dam release day, I don’t think this section would have been navigable at all. If we’d have gone a bit farther north, we would have been putting into the main river channel -- still within a section of rapids according to the map, but not such a shallow rocky section.
Recreational Kayaks on Whitewater?
Before this trip, I wasn’t exactly sure how we’d do on the rapids with our recreational kayaks (an Emotion Glide, and a Perception Sport Sound 9.5). I’d done some research, and spoken to a few people with whitewater experience, and the consensus seemed to be that class-I rapids might be doable, class-IIIs would not be, and class-IIs were iffy. But there were also some people who scoffed at the very idea of taking recreational kayaks on rapids, no matter how gentle or rough.
Our previous experience included about 10 kayaking trips for me, and 5 for Kim, on rivers, lakes, and the ocean with small waves. So while we’d never done whitewater before, we had some kayaking experience under our belts. We also had life jackets, emergency whistles, cups for bailing water, and a flotation bag in my kayak, with flotation pillars in Kim’s (now upgraded to a flotation bag as well). We also had my iPhone (in an Aquapac which is quite awesome BTW), which I use for photos and navigation, and of course could be used to call for help. We didn’t end up needing any of those things, but the point is that we were reasonably prepared.
Based on all of that, I felt confident that we wouldn’t have any major trouble doing class-I rapids, particularly a small number of them on a relatively short stretch of a wide river, which is partly why I chose the Weissport canal loop for our first whitewater run. And it turned out to be just fine, quite easy, and super fun. It would be very difficult, if not impossible, to roll either of our kayaks, so unfortunately we won’t be heading up into the Lehigh Gorge and hitting the class-III rapids until we’re able to get some whitewater kayaks, but I definitely plan to do more of the many class-Is and perhaps some of the class-IIs in the sections south of the gorge.
Photos
As usual you can check out the photos (including the GPS map) from the trip.
Update: we went back a few weeks later and did a longer version of this run, kayaking from Jim Thorpe to Lehighton.
Previous kayak trip: Kayaking the Lock 60 Loop on the Schuylkill River.Next kayak trip: Kayaking the Hiwassee River in Tennessee.
Kayaking the Lock 60 Loop on the Schuylkill River
Even though it was a disgusting 100 degrees on Saturday, and even though the river water was 90 degrees (no, really), Kim and I decided to paddle the lock 60 loop in Phoenixville/Mont Clare. Despite the heat, it was a nice trip.
We started at the parking lot just below Black Rock Dam, where we got into the river. The first thing we did was paddle upstream to the dam to check it out (though we couldn’t get all that close because it got really shallow, since the water level is a bit low: about 500 cfs at the Pottstown gage). Then we paddled downstream for about an hour, until we reached the portage point. This is easy to find because of the power lines: the portage trail from the river to the canal runs right under them. It’s a quick 5-minute walk where you can drag your kayak over the soft grass and dirt, then you hop in the canal and paddle "upstream" back to the parking lot (of course the water isn’t moving in the canal, but it’s upstream relative to the river’s flow).
The river at this section is pretty nice, with lots of small islands of really-soft-looking green plants, plus a bunch of ducks, geese, and cranes. And the canal is neat too, even though the water in it is of course somewhat stagnant. But it’s neat because it’s largely covered by a canopy of trees, and it goes right by a whole bunch of backyards, where people have set up small docks and fire rings and benches by the water. We spotted a few turtles too, though they were camera-shy and slid off their logs into the water before we could get any good shots of them.
Check out all the photos on Kim’s site, and here’s the GPS trail of our route:

Previous kayak trip: Schuylkill River Kayaking: Pottstown to Linfield.
Next kayak trip: Kayaking the Lehigh River: Weissport Canal Loop.
Schuylkill River Kayaking: Pottstown to Linfield
My second kayak run on the Schuylkill was from Pottstown (technically, North Coventry) to Linfield. The trip was 9.5 miles and took just under 3 hours.
I really like this section of the river. Maybe it’s just because it was a nice sunny day, whereas my previous run (from Union Township to Pottstown) was on a cloudy day, but it seemed nicer and more rustic. You do pass the Limerick nuclear power plant, which is kind of neat, but after passing it, you’re right in the path of the noise from one of its buildings, which is a semi-loud fan-type noise that lasts for about a mile.
One highlight of this run is a very small section of rapids right near the take-out point. When I say small, I mean, it’s tiny; if it registers at all, it’s certainly no more than a class-I rapid. So it’s nothing that whitewater-lovers would get excited about, but it’s pretty fun in the middle of a nice peaceful trip down the Schuylkill.
A bit before the rapids, I saw some guys on the right bank swinging on a rope swing out over the water. I asked if they used it to launch into the water, and they said yeah, but only when the flow is up around 4000 cfs. On this day, it was about 1000, and only 2-3 feet deep in that area; I can’t imagine they see many days with the kind of discharge necessary to jump in.
I think one of the reasons I love the Schuylkill River so much is that it’s right there. I mean, it’s been right there my whole life, just waiting for me to discover it and get into it. I’m sorry it took me so long, but now I’m having a great time. It’s no Yampa River, but measuring Pennsylvania against Colorado is not exactly a fair fight :)
Thanks to the sunshine, I was able to take some pretty nice kayaking photos this time, so check them out!
Previous kayak trip: Kayaking on the Schuylkill River (Union Township to Pottstown).Next kayak trip: Kayaking the Lock 60 Loop on the Schuylkill River.
The Primal Blueprint Carbohydrate Curve
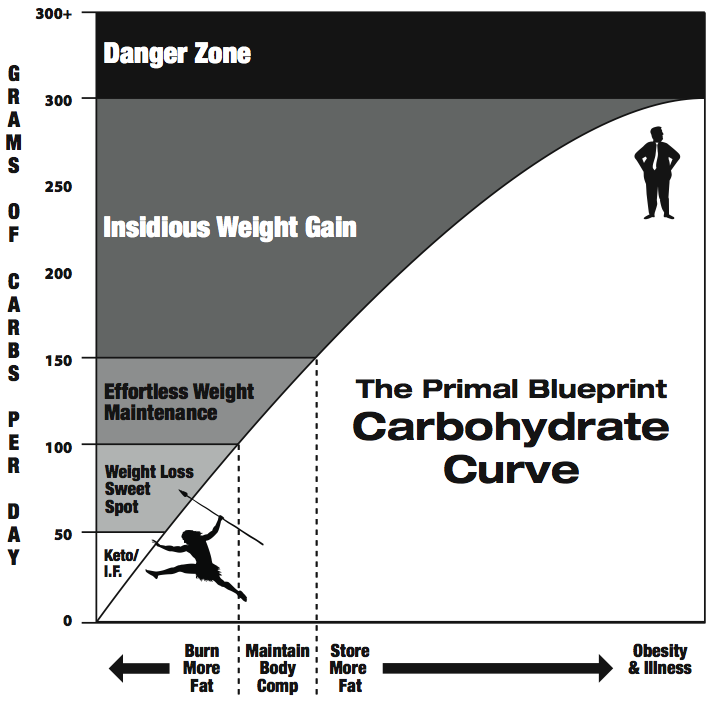
Pretty much says it all. Notice that there’s no mention of calories nor dietary fat, because the fact is, those have very little impact on weight and body composition.
From Mark’s Primal Blueprint diagrams page.
What the Government is Really Feeding Us
By now you’ve probably seen the "improved" version of the government food pyramid, which is the food plate:
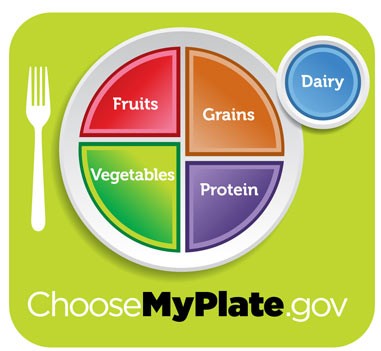
Of course, it’s the same old scientifically-discredited message: load up on fruit (sugar) and grains (more sugar) and avoid fat. And what do you get when you follow the government’s advice? All of this can be yours:

The solution is painfully obvious to anyone with half a brain: just eat real food. Eat the foods that people have ALWAYS eaten, for the vast majority of human history, instead of the grains, vegetable oils, and other processed foods that modern man has invented. In other words:

(Images via @robbwolf’s Twitter feed.)
Why You Can't Get Sunburn Near Sunrise And Sunset
[For people finding this page by searching for things like "how late can you get sunburn", the short answer is that in the continental US, it’s virtually impossible to get a sunburn before 10 AM or after 4 PM, except in subtropical places like Florida.]
When the weather starts getting nice, I start thinking about the sun and UV rays and how to avoid sunburn. I always try to plan my outdoor activities (biking, tubing, etc) to avoid the worst part of the day in terms of sunlight, which is when the sun is directly overhead -- around 1 PM in North America. Sun exposure is crucial for proper health, but only if it’s time-limited so that it doesn’t give you a sunburn.
You’ve probably noticed that, while you can get a tan/sunburn in half an hour or so around midday, it’s pretty much impossible to get any tan -- let alone sunburn -- within an hour or two of sunrise and sunset. When I got my iPhone 4 last June, I stood in line at the Lehigh Valley Apple store from about 4:30 PM to 7 PM. It was a hot, sunny day; the Apple employees were giving out bottled water, and the line was in direct sunlight the whole time. Despite this, I didn’t get a bit of tan.
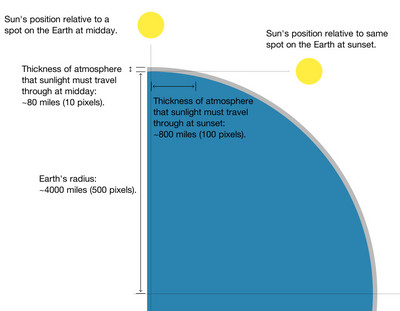
The reason is because sunlight has to travel through the Earth’s atmosphere before it reaches us on the surface, and the atmosphere blocks some of the UV light. When the sun is directly overhead, its light has to travel through a certain amount of atmosphere, but when the sun is at more of an angle (further from midday), the amount of atmosphere that sunlight must travel through is greater.
But how much greater? I wanted to figure this out, and a little Googling didn’t turn up anything. So I thought about how to model it, which is pretty simple: you just need to draw a big circle with a thin band surrounding it, then compare the thickness of the band at different angles. So that’s what I did:

The Earth’s radius is about 4000 miles, and the atmosphere (depending on how you want to define it) is, say, 80 miles thick. The precise thickness doesn’t matter for our purposes here, though; all that matters is the ratio between the smallest thickness (the midday atmosphere) and the greatest thickness (the sunrise/sunset atmosphere).
By drawing two exact circles that are concentric, and using 1 pixel to represent 8 miles, it’s easy to "calculate" the sunrise/sunset thickness: you just need to count/measure the pixels. There are 100 of them, compared to 10 pixels for the midday thickness, so the UV radiation must pass through ten times as much atmosphere at sunrise/sunset as it does at midday. That explains why virtually none of that UV light passes through around sunrise and sunset: the atmosphere is far too thick for the UV to penetrate.
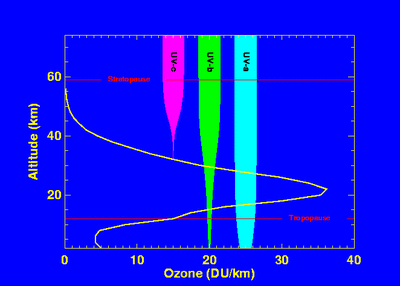
Update: here’s a related graph from NASA (via Wikipedia) showing how much of each UV fraction is blocked by the atmosphere (mainly the ozone layer):

It shows that the atmosphere blocks all UVC, and most UVB, but only a small amount of UVA.
Home – Create Post – Archives – Login – CMS by Encodable