« previous: Smoke-free Restaurants in Pennsylvania | next: Snake Hunter Bit By Giant Python »
Digital Photo Editing
It’s interesting to look back on the photos that I was taking 6 years ago when I got my first camera. Going through my favorites page recently, I noticed the photo that I’ve posted below. I’ve liked this photo from the first time I saw it -- obviously, since I tagged it as a favorite -- but looking at it now, after having not really looked at it for a long time, I see that it’s just crying out for some post-processing.
Actually, the first thing I thought when I came upon this photo the other day was: "what was I thinking??" Not because it’s a bad photo, but because just glancing at it, I immediately saw a few simple things I could do that would make it look much better. I realized just how much I didn’t know about digital photography 6 years ago, and it kind of surprised me. Things that are now obvious to me were not even on my radar back then.
Anyway, I quickly applied those fixes to the photo, and you can click here to cause the image below to cycle through the different editing steps.
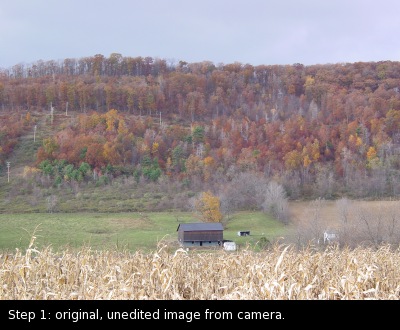
The first image is straight out of the camera, no editing applied.
The second image is the result of a 5-second one-click operation: open the image in the GIMP, click Tools > Color Tools > Levels, click the "auto" button, click OK. No brainpower required. Of course you can tweak the levels manually if you’d like, and auto-level isn’t a cure-all for every photo, but for many photos it "just works" and gives great results.
The third image modification took about 2 minutes to complete. I used GIMP’s Lasso tool (for freehand selections) to draw a selection around the sky in the photo. It did not have to be a precise selection -- I did it in just a few seconds, very roughly. Then I clicked Select > Feather and set it to about 100 pixels and hit OK. This causes GIMP to change the selection from having a sharp, well-defined boundary to having a soft blurred boundary, so that any operation you apply on the selection will be nicely blended with the surroundings, instead of having a sharp and obvious edge. Finally, I clicked Tools > Color Tools > Colorize, and used the 3 sliders (Hue, Saturation, and Lightness) to bring out more of the blue in the sky.
The fourth modification also took just a couple of minutes. I started by creating a new layer and filling it in with solid black. Next I clicked Select > Rounded Rectangle to create a selection that included the entire image except for the corners, which were rounded out. Then I used Select > Feather again, to blur/blend the selection. Then I clicked Edit > Clear to clear out most of the black layer, leaving just the corners black. Finally, in the Layers dialog, I used the Opacity slider to decrease the opacity of the corners.
I think the final image is much better than the original. Of course, some might prefer a less saturated image, and the image might work just as well without the vignette. But the point is, applications like the GIMP (or Photoshop, etc) give you a lot of power that’s pretty simple to use, and allow you to really get the most out of your photos.
Comments:
Reply to this message here:
[ Home – Create Post – Archives – Login – CMS by Encodable ]